 Hyundai Elantra: Steering Column and Shaft. Repair procedures
Removal
| 1. |
Disconnect the battery negative cable from the battery and then
wait for 30 seconds.
|
| 2. |
Turn the steering wheel so that the front wheels can face straight
ahead.
|
| 3. |
Loosen the torx bolts which are located on the both side of the
steering wheel.
|
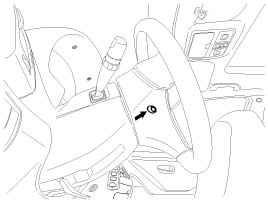
| 4. |
Disconnect the connector (A) from the airbag module and then remove
the airbag module from the steering wheel.
|
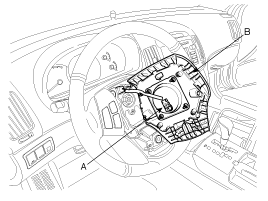
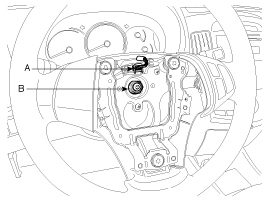
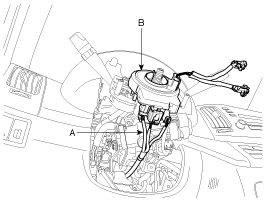
| 5. |
Disconnect the remote switch connector (A) and remove the steering
wheel lock nut (B) and washer.
|
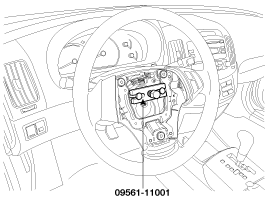
| 6. |
Remove the steering wheel from the steering column shaft by using
a SST (09561-11001).
|
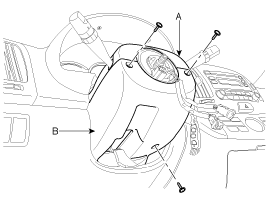
| 7. |
Remove the steering column upper (A) and lower (B) shroud.
|
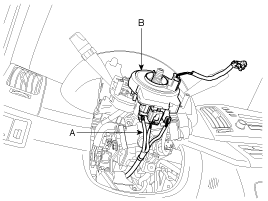
| 8. |
Disconnect the connectors (A) from the lower portion of the clock
spring and then remove the clock spring (B) from the steering column
shaft.
|
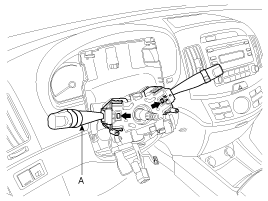
| 9. |
Remove the multifunction switches (A) from the steering column
with the portion indicated by the arrow pressed.
|
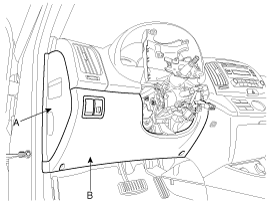
| 10. |
Remove the lower side panel (A) and crash pad (B).
|
| 11. |
Remove the reinforce panel (A).
|
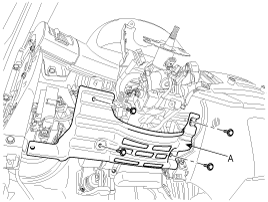
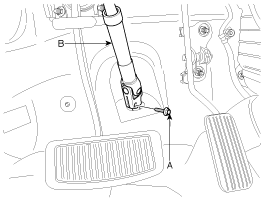
| 12. |
Loosen the bolt (A) and then disconnect the universal joint assembly
(B) from the pinion of the steering gear box.
|
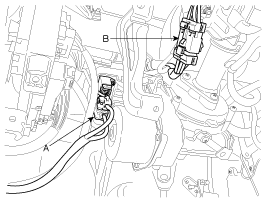
| 13. |
Disconnect the connectors (A, B, C, D).
|
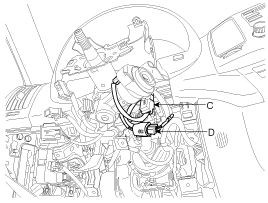
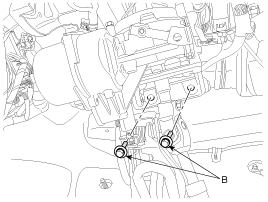
| 14. |
Remove the steering column mounting bolts (B).
|
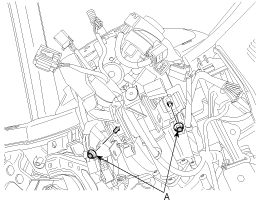
| 15. |
Remove the steering column & EPS unit assembly (C) by loosening
the mounting nuts (A).
|
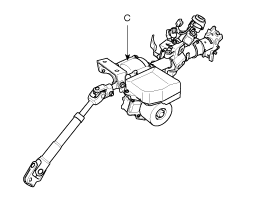
Disassembly And Reassembly
Do not disassemble the steering column & EPS unit assembly.
|
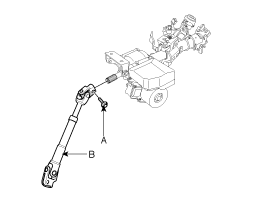
| 1. |
Loosen the bolt (A) and then disconnect the universal joint assembly
(B) from the steering column assembly.
|
| 2. |
Make a groove the head of special bolts (A) by a punch.
|
| 3. |
Loosen the special bolts by using screw driver and than remove
the key lock assembly (B) from the steering column assembly.
|

| 4. |
Reassembly is the reverse of the disassembly. When reassembling
the key lock assembly, install the key lock assembly to the steering
column and then tighten new special bolts until its head (A) is cut
off.
|

Inspection
| 1. |
Check the steering column for damage and deformation.
|
| 2. |
Check the connection for play, damage and smooth operation.
|
| 3. |
Check the join bearing for damage and wear.
|
| 4. |
Check the tilt bracket for damage and cracks.
|
| 5. |
Check the key lock assembly for proper operation and replace it
if necessary.
|
Installation
Apply the multipurpose grease to sliding surface of the each part
before the installation.
|
| 1. |
Install the steering column & universal joint assembly by tightening
the bolts (B) and nuts (A).
|
| 2. |
Connect the connectors (A, B, C, D).
|
| 3. |
Connect the universal joint assembly (B) to pinion of the steering
gear box and then tighten the bolt (A).
|
| 4. |
Install the reinforce panel (A).
|
| 5. |
Install the lower crash pad (A) & side panel.
|
| 6. |
Install the multifunction switches (A) to steering column.
|
| 7. |
Install the clock spring (B) to steering column assembly and then
connect the connectors (A).
|
| 8. |
Install the steering column upper (A) and lower (B) shroud.
|
| 9. |
Connect the remote switch connector (A).
|
| 10. |
Install the steering wheel to the steering column shaft and then
tighten the lock nut (B) and the washer together.
|
| 11. |
Connect the connector (A) to air bag module and then install the
airbag module (B) to steering wheel.
|
| 12. |
Tighten the torx bolts which are located on the both side of the
steering wheel.
|
| 13. |
Connect the battery negative cable to the battery.
|
| 14. |
Check and adjust the front wheel alignment. (Refer to SS group)
|
| 15. |
When the steering column & EPS unit assembly is replaced, perform
EPS type recognition procedure using a scan tool. (Refer to EPS type
recognition)
|
| 16. |
Perform the ASP (Absolute Steering Position) calibration procedure.
(Refer to ASP calibration)
|


