Hyundai Elantra: Repair procedures
Operation and Leakage Check
Check all of the following items:
|
Component |
Procedure |
|
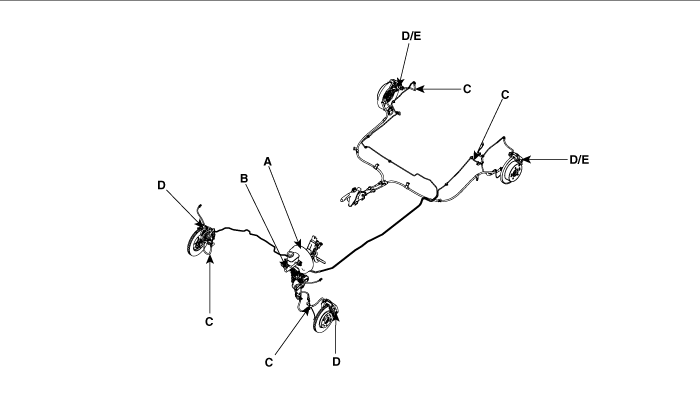
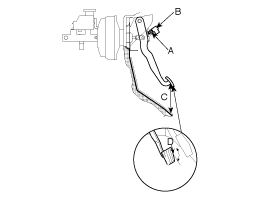
Brake Booster (A) |
Check brake operation by applying the brakes during a test drive.
If the brakes do not work properly, check the brake booster. Replace the
brake booster as an assembly if it does not work properly or if there are
signs of leakage. |
|
Piston cup and pressure cup inspection (B) |
Check brake operation by applying the brakes. Look for damage or signs
of fluid leakage. Replace the master cylinder as an assembly if the pedal
does not work properly or if there is damage or signs of fluid leakage. |
|
Check for a difference in brake pedal stroke between quick and slow
brake applications. Replace the master cylinder if there is a difference
in pedal stroke |
|
|
Brake hoses (C ) |
Look for damage or signs of fluid leakage. Replace the brake hose
with a new one if it is damaged or leaking. |
|
Caliper piston seal and piston boots (D) |
Check brake operation by applying the brakes. Look for damage or signs of fluid leakage. If the pedal does not work properly, the brakes drag, or there is damage or signs of fluid leakage, disassemble and inspect the brake caliper. Replace the boots and seals with new ones whenever the brake caliper is disassembled. |
|
Wheel cylinder piston cup and dust cover (E) |
Check brake operation by applying the brakes. Look for damage or signs of fluid leakage. If the pedal does not work properly, the brakes drag, or there is damage or signs of fluid leakage, replace the wheel cylinder. |
Brake Booster Operating Test
For simple checking of the brake booster operation, carry out the following
tests :
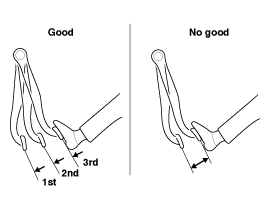
| 1. |
Run the engine for one or two minutes, and then stop it. If the
pedal depresses fully the first time but gradually becomes higher when
depressed succeeding times, the booster is operating properly, if the
pedal height remains unchanged, the booster is defective.
|
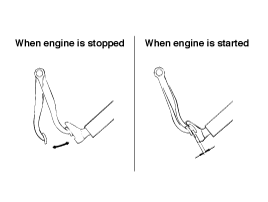
| 2. |
With the engine stopped, step on the brake pedal several times.
Then step on the brake pedal and start the engine. If the pedal moves
downward slightly, the booster is in good condition. If there is no
change, the booster is defective.
|
| 3. |
With the engine running, step on the brake pedal and then stop
the engine. Hold the pedal depressed for 30 seconds. If the pedal height
does not change, the booster is in good condition, if the pedal rises,
the booster is defective. If the above three tests are okay, the booster
performance can be determined as good. Even if one of the above three
tests is not okay, check the check valve, vacuum hose and booster for
defect.
|
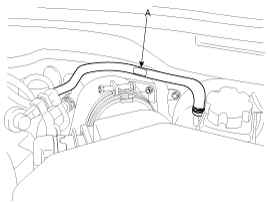
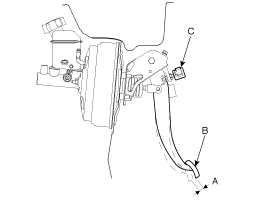
Vacuum Hose (Check Valve)
| Inspection |
| 1. |
Disconnect the brake booster vacuum hose (check valve built in)
(A) at the booster .
|
| 2. |
Start the engine and let it idle. There should be vacuum available.
If no vacuum is available, the check valve is not working properly.
Replace the brake booster vacuum hose and check valve and retest.
|
Brake Pedal & Brake Switch Adjustment
| Pedal Height |
| 1. |
Disconnect the brake switch connector, loosen the brake switch
locknut (A), and brake off the brake switch (B) until it is no longer
touching the brake pedal.
|
| 2. |
Measure the pedal height (C) from the middle of the left-side
center of the pedal pad (D).
|
| 3. |
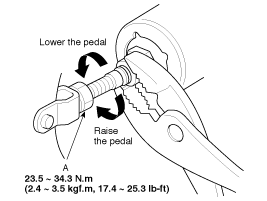
Loosen the pushrod locknut (A), and screw the pushrod in or out
with pliers until the standard pedal height from the floor is reached.
After adjustment, tighten the locknut firmly. Do not adjust the pedal
height with the pushrod depressed.
|
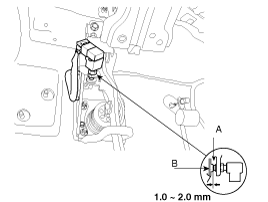
Stop Lamp Switch Clearance
Screw in the stop lamp switch until its switch rod is fully depressed
(threded end (A) touching the pad (B) on the pedal arm) then brake off the switch
3/4 turn to make 1.0~2.0 mm(0.04~0.08 in.) of clearance between the stop lamp
switch pad. Make sure that the brake lights go off when the pedal is released.
Pedal Free Play
| 1. |
With the engine stopped, depress the brake pedal two or three
times. After eliminating the vacuum in the power brake booster, press
the pedal(B) down by hand, and confirm that the amount of movement(A)
before resistance is met (the free play) is within the standard value.
|
| 2. |
If free play does not reach the standard value, check that clearance
between the outer case of stop lamp switch(C) and brake pedal is within
the standard value. If free play exceeds the standard value, it is probably
due to excessive clearance between the clevis pin and brake pedal arm.
Check for excessive clearance and replace faulty parts as required.
|
| 3. |
Start the engine, depress the brake pedal with approximately 120kg(1176.8N,
264.5 lb) of force, and check for oil leakage in the master cylinder,
brake line and each connecting part. Repair the faulty parts as required.
|
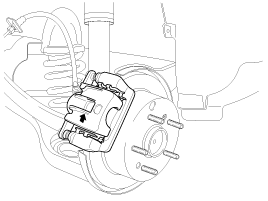
Inspection of Front Disc Brake Pad
| 1. |
Check the brake pad thickness through the caliper body inspection
hole.
|
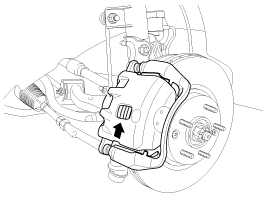
Inspection of Rear Disc Brake Pad
| 1. |
Check the brake pad thickness through the caliper body inspection
hole.
|