Disassembly
|
1. |
M/T : remove flywheel.
|
|
2. |
A/T : remove drive plate.
|
|
3. |
Install engine to engine stand for disassembly.
|
|
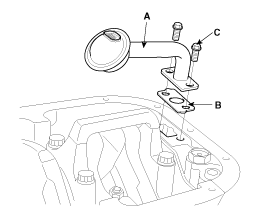
6. |
Remove oil level gauge assembly (A).
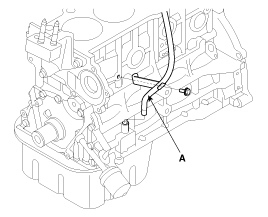
|
|
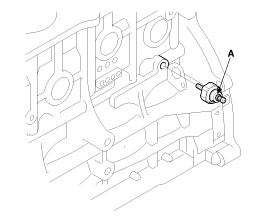
8. |
Remove oil pressure sensor (A).
|
|
11. |
Remove oil screen.
Remove the 2bolts(C), oil screen (A) and gasket (B).
|
|
12. |
Check the connecting rod end play.
|
|
13. |
Remove the connecting rod caps and check oil clearance.
|
|
14. |
Remove piston and connecting rod assemblies.
|
(1) |
Using a ridge reamer, remove all the carbon from the top
of the cylinder.
|
|
(2) |
Push the piston, connecting rod assembly and upper bearing
through the top of the cylinder block.
|
• |
Keep the bearings, connecting rod and
cap together.
|
|
• |
Arrange the piston and connecting rod
assemblies in the correct order.
|
|
|
|
|
16. |
Remove rear oil seal case.
Remove the 5 bolts(B) and rear oil seal case (A).
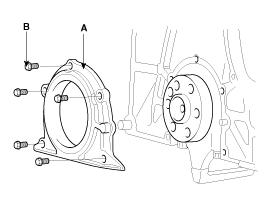
|
|
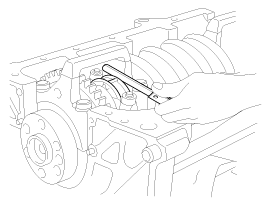
17. |
Remove crankshaft bearing cap and check oil clearance.
|
|
18. |
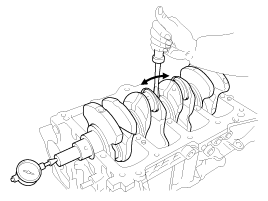
Check the crankshaft end play.
|
|
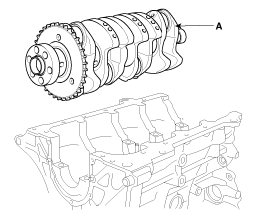
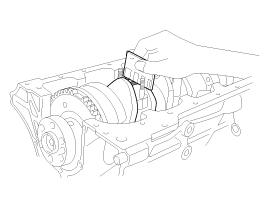
19. |
Lift the crankshaft (A) out of the engine, being careful not to
damage journals.
|
Arrange the main bearings and trust washers in the correct
order.
|
|
|
20. |
Check fit between piston and piston pin.
Try to move the piston back and forth on the piston pin. If any
movement is felt, replace the piston and pin as a set.
|
|
21. |
Remove piston rings.
|
(1) |
Using a piston ring expender, remove the 2 compression
rings.
|
|
(2) |
Remove the 2side rails and oil ring by hand.
|
Arrange the piston rings in the correct order
only.
|
|
|
|
22. |
Disconnect connecting rod from piston.
|
Inspection
Connecting Rod And Crankshaft
|
1. |
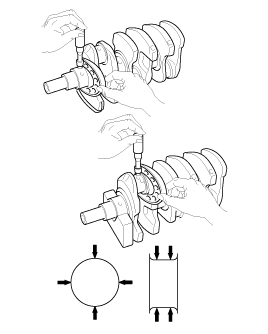
Check the connecting rod end play.
Using a feeler gauge, measure the end play while moving the connecting
rod back and forth.
Standard end play :
0.1~ 0.25mm(0.004 ~ 0.010in)
Maximum end play :
0.4mm(0.016in)
|
| A. |
If out-of-tolerance, install a new connecting rod.
|
| B. |
If still out-of-tolerance, replace the crankshaft.
|
|
|
2. |
Check the connecting road bearing oil clearance.
|
(1) |
Check the matchmarks on the connecting rod and cap are
aligned to ensure correct reassembly.
|
|
(2) |
Remove the 2 connecting rod cap nuts.
|
|
(3) |
Remove the connecting rod cap and bearing half.
|
|
(4) |
Clean the crank pin and bearing.
|
|
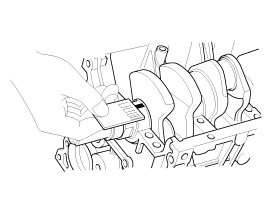
(5) |
Place plastigage across the crank pin.
|
|
(6) |
Reinstall the bearing half and cap, and torque the nuts.
Tightening torque
49.0 ~ 52.0 Nm (5.0 ~ 5.3kgf.m, 36.2 ~ 38.3lb-ft)
|
|
Do not turn the crankshaft.
Always use a new connecting rod cap nuts.
|
|
|
(7) |
Remove the 2 nuts, connecting rod cap and bearing half.
|
|
(8) |
Measure the plastigage at its widest point.
Standard oil clearance
0.024 ~ 0.042mm(0.0009 ~ 0.0017in)
|
|
|
(9) |
If the plastigage measures too wide or too narrow, remove
the upper half of the bearing, install a new, complete bearing
with the same color mark (select the color as shown in the next
column), and recheck the clearance.
|
Do not file, shim, or scrape the bearings or the
caps to adjust clearance.
|
|
|
(10) |
If the plastigage shows the clearance is still incorrect,
try the next larger or smaller bearing (the color listed above
or below that one), and check clearance again.
|
If the proper clearance cannot be obtained by
using the appropriate larger or smaller bearings, replace
the crankshaft and start over.
|
|
If the marks are indecipherable because of an
accumulation of dirt and dust, do not scrub them with
a wire brush or scraper. Clean them only with solvent
or detergent.
|
Connecting Rod Mark Location
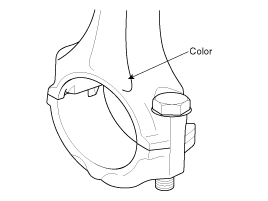
Discrimination Of Connecting Rod
Class
|
Mark
|
Inside Diameter
|
A
|
White
|
48.00 ~ 48.006mm
(1.8896 ~ 1.8899in.)
|
B
|
None
|
48.006 ~ 48.012mm
(1.8899 ~ 1.8902in.)
|
C
|
Yellow
|
48.012 ~ 48.018mm
(1.8902 ~ 1.8904in.)
|
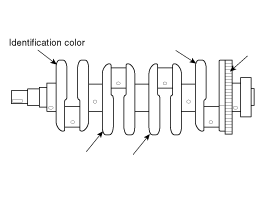
Crankshaft Pin Mark Location
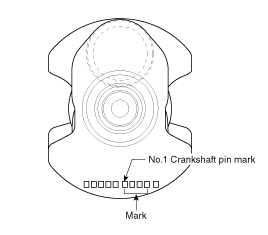
Discrimination Of Crankshaft
Class
|
Mark
|
Outside Diameter Of Pin
|
I
|
Yellow
|
44.960 ~ 44.966mm
(1.7700 ~ 1.7703in.)
|
II
|
None
|
44.954 ~ 44.960mm
(1.7698 ~ 1.7700in.)
|
III
|
White
|
44.948 ~ 44.954mm
(1.7696 ~ 1.7698in.)
|
Place Of Identification Mark (Connecting Rod Bearing)
Discrimination Of Connecting Rod Bearing
Class
|
Mark
|
Thickness Of Bearing
|
AA
|
Blue
|
1.514 ~ 1.517mm
(0.0596 ~ 0.0597in.)
|
A
|
Black
|
1.511 ~ 1.514mm
(0.0595 ~ 0.0596in.)
|
B
|
None
|
1.508 ~ 1.511mm
(0.0594 ~ 0.0595in.)
|
C
|
Green
|
1.505 ~ 1.508mm
(0.0593 ~ 0.0594in.)
|
D
|
Yellow
|
1.502 ~ 1.505mm
(0.0591 ~ 0.0593in)
|
|
|
(11) |
Selection
Crankshaft Indentification
Mark
|
Connecting Rod Identification
Mark
|
Assembing Classification
Of Bearing
|
I (Yellow)
|
A (White)
|
D (Yellow)
|
B (None)
|
C (Green)
|
C (Yellow)
|
B (None)
|
II (None)
|
A (White)
|
C (Green)
|
B (None)
|
B (None)
|
C (Yellow)
|
A (Black)
|
III (White)
|
A (White)
|
B (None)
|
B (None)
|
A (Black)
|
C (Yellow)
|
AA (Blue)
|
|
|
|
3. |
Check the crankshaft bearing oil clearance.
|
(1) |
To check main bearing-to-journal oil clearance, remove
the main caps and bearing halves.
|
|
(2) |
Clean each main journal and bearing half with a clean
shop tower.
|
|
(3) |
Place one strip of plastigage across each main journal.
|
|
(4) |
Reinstall the bearings and caps, then torque the bolts.
Tightening torque :
27.5~31.4Nm (2.8~3.2kgf.m, 20.3~23.11lb-ft) +
60° ~ 64°
|
|
Do not turn the crankshaft.
Always use a new main bearing cap bolts.
|
|
|
(5) |
Remove the cap and bearing again, and measure the widest
part of the plastigage.
Standard oil clearance
:
0.028 ~ 0.046mm (0.0011 ~ 0.0018in)
|
|
|
(6) |
If the plastigage measures too wide or too narrow, remove
the upper half of the bearing, install a new, complete bearing
with the same color mark (select the color as shown in the next
column), and recheck the clearance.
|
Do not file, shim, or scrape the bearings or the
caps to adjust clearance.
|
|
|
(7) |
If the plastigage shows the clearance is still incorrect,
try the next larger or smaller bearing (the color listed above
or below that one), and check clearance again.
|
If the proper clearance cannot be obtained by
using the appropriate larger or smaller bearings, replace
the crankshaft and start over.
|
|
If the marks are indecipherable because of an
accumulation of dirt and dust, do not scrub them with
a wire brush or scraper. Clean them only with solvent
or detergent.
|
|
|
Connecting rods
| 1. |
When reinstalling, make sure that cylinder numbers put on the
connecting rod and cap at disassembly match. When a new connecting rod
is installed, make sure that the notches for holding the bearing in
place are on the same side.
|
| 2. |
Replace the connecting rod if it is damaged on the thrust faces
at either end. Also if step wear or a severely rough surface of the
inside diameter of the small end is apparent, the rod must be replaced
as well.
|
| 3. |
Using a connecting rod aligning tool, check the rod for bend and
twist. If the measured value is close to the repair limit, correct the
rod by a press. Any connecting rod that has been severely bent or distorted
should be replaced.
Allowable bend of connecting
rod :
0.05mm / 100mm (0.0020 in./3.94 in) or less
Allowable twist of connecting
rod :
0.1mm / 100mm (0.0039 in./3.94 in) or less
|
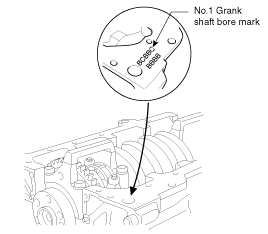
Letters have been stamped on the end of the block as a mark for
the size of each of the 5 main journal bores.
Discrimination Of Cylinder Block
Calss
|
Mark
|
Inside Diameter
|
a
|
A
|
59.000 ~ 59.006mm
(2.3228 ~ 2.3230in.)
|
b
|
B
|
59.006 ~ 59.012mm
(2.3230 ~ 2.3233in.)
|
c
|
C
|
59.012 ~ 59.018mm
(2.3233 ~ 2.3235in.)
|
Crankshaft Journal Mark Location
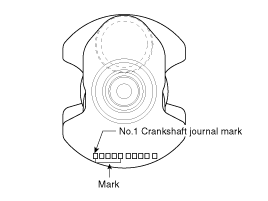
Discrimination Of Crankshaft
Class
|
Mark
|
Outside Diameter Of Journal
|
I
|
Yellow
|
54.956 ~ 54.962mm
(2.1636 ~ 2.1638in.)
|
II
|
None
|
54.950 ~ 54.956mm
(2.1633 ~ 2.1636in.)
|
III
|
White
|
54.944 ~ 54.950mm
(2.1631 ~ 2.1633in.)
|
Place Of Identification Mark (Crankshaft Bearing)
Discrimination Of Crankshaft Bearing
Class
|
Mark
|
Thickness Of Bearing
|
AA
|
Blue
|
2.014 ~ 2.017mm
(0.0793 ~ 0.0794in.)
|
A
|
Black
|
2.011 ~ 2.014mm
(0.0791 ~ 0.0793in.)
|
B
|
None
|
2.008 ~ 2.011mm
(0.0790 ~ 0.0791in.)
|
C
|
Green
|
2.005 ~ 2.008mm
(0.0789 ~ 0.790in.)
|
D
|
Yellow
|
2.002 ~ 2.005mm
(0.0788 ~ 0.0789in.)
|
Selection
Crankshaft Identification Mark
|
Crankshaft Bore Identification Mark
|
Assembling Classification Of Bearing
|
I (Yellow)
|
a (A)
|
D (Yellow)
|
b (B)
|
C (Green)
|
c (C)
|
B (None)
|
II (None)
|
a (A)
|
C (Green)
|
b (B)
|
B (None)
|
c (C)
|
A (Black)
|
III (White)
|
a (A)
|
B (None)
|
b (B)
|
A (Black)
|
c (C)
|
AA (Blue)
|
|
| 4. |
Check crankshaft end play.
Using a dial indicator, measure the thrust clearance while prying
the crankshaft back and forth with a screwdriver.
Standard end play :
0.06 ~ 0.26mm (0.0023 ~ 0.010in)
Limit : 0.30mm
(0.0118in)
|
If the end play is greater than maximum, replace the thrust bearings
as a set.
Thrust bearing thickness :
2.44 ~ 2.47mm(0.096 ~ 0.097in)
|
|
| 5. |
Inspect main journals and crank pins
Using a micrometer, measure the diameter of each main journal
and crank pin.
Main journal diameter :
56.942 ~ 56.962mm (2.2418~2.2426in)
Crank pin diameter :
44.946 ~ 44.966mm (1.7695 ~ 1.7703in)
|
|
Cylinder Block
|
1. |
Remove gasket material.
Using a gasket scraper, remove all the gasket material from the
top surface of the cylinder block.
|
|
2. |
Clean cylinder block
Using a soft brush and solvent, thoroughly clean the cylinder
block.
|
|
3. |
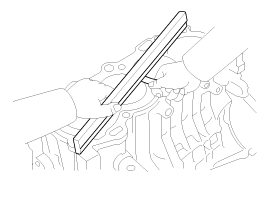
Inspect top surface of cylinder block for flatness.
Using a precision straight edge and feeler gauge, measure the
surface contacting the cylinder head gasket for warpage.
Flatness of cylinder block gasket
surface
Standard : Less than 0.03mm(0.0012 in)
Limit : 0.05 mm (0.0020 in)
|
|
|
4. |
Inspect cylinder bore diameter
Visually check the cylinder for vertical scratchs.
If deep scratches are present, replace the cylinder block.
|
|
5. |
Components
1. Oil screen
2. Gasket
3. Crankshaft
4. Oil seal
5. Front case
6. Thrust bearing
7. Drive plate
8. Washer
9. Adapter plate
10 ...
|
 Hyundai Elantra: Repair procedures

