 Hyundai Elantra: Repair procedures (A4CF2)
Basic Inspection Adjustment
Transaxle Fluid Level
Inspection
| 1. |
Drive the vehicle until the fluid reaches normal operating temperature
[70~80°C(158~176°F)].
|
| 2. |
Place the vehicle on a level surface.
|
| 3. |
Move the gear selector lever through all gear positions. This
will fill the torque converter with trans fluid. Set the selector lever
to the "N" (Neutral) position.
|
| 4. |
Before removing the oil level gauge, wipe all contaminants from
around the oil level gauge. Then take out the oil level gauge and check
the condition of the fluid.
|
| 5. |
Check that the fluid level is in the "HOT" mark on the oil level
gauge. If fluid level is low, add automatic transaxle fluid until the
level reaches the "HOT" mark.
|
| 6. |
Insert the oil level gauge securely.
|
Replacement
If you have a fluid changer, use this changer to replace the fluid. If
you do not have a fluid replace the fluid by the following procedure.
| 1. |
Disconnect the hose, which connects the transmission and the oil
cooler (inside the radiator).
|
| 2. |
Start the engine and let the fluid drain out.
|
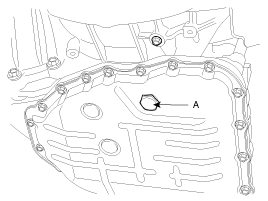
| 3. |
Remove the drain plug(A) from the bottom of the transmission case
to drain the fluid.
|
| 4. |
Install the drain plug via the gasket, and tighten it the specified
torque.
|
| 5. |
Pour the new fluid in through the oil filler tube.
|
| 6. |
Repeat the procedure in step (2).
|
| 7. |
Pour the new fluid in through the oil filler tube.
|
| 8. |
Reconnect the hose, which was disconnected in step (1) above,
and firmly replace the oil level gauge.
(In case of this "replace", this means after wiping off any dirt
around the oil level gauge, insert it into the filler tube.)
|
| 9. |
Start the engine and run it at idle for 1~2 minutes.
|
| 10. |
Move the select lever through all positions, and then move it
to the "N" or "P" position.
|
| 11. |
Drive the vehicle until the fluid temperature rises to the normal
temperature (70~80°C(158~176°F)), and then check the fluid level again.
The fluid level must be at the HOT mark.
|
| 12. |
Firmly insert the oil level gauge into the oil filler tube.
|
Torque Converter Stall Test
This test measures the maximum engine speed when the select lever is at
the "D" or "R" position and the torque converter stalls to test the operation
of the torque converter, starter motor and one-way clutch operation and the
holding performance of the clutches and brakes in the transmission.
Do not let anybody stand in front of or behind the vehicle while
this test is being carried out.
|
| 1. |
Check the automatic transmission fluid level and temperature and
the engine coolant temperature.
|
| 2. |
Check both rear wheels (left and right).
|
| 3. |
Pull the parking brake lever on, with the brake pedal fully depressed.
|
| 4. |
Start the engine.
|
| 5. |
Move the select lever to the "D" position, fully depress the accelerator
pedal and take a reading of the maximum engine speed at this time.
|
Hydraulic Pressure Test
| 1. |
Warm up the engine until the automatic transaxle fluid temperature
is 80~100°C(176~212°F).
|
| 2. |
Jack up the vehicle so that the wheels are free to turn.
|
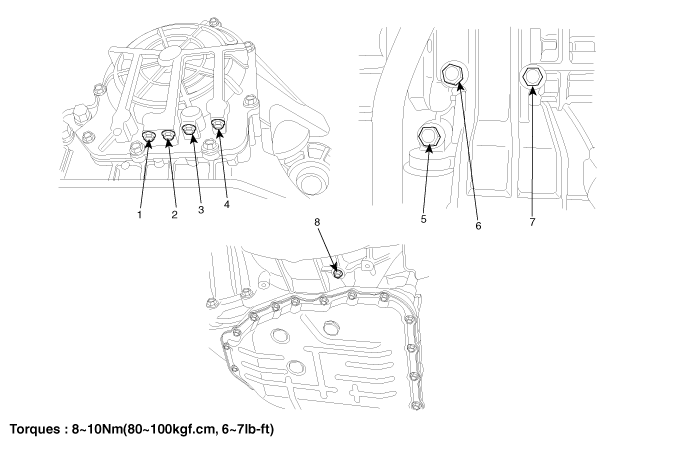
| 3. |
Connect the special tools(09452-21500, 09452-21000) oil pressure
gauge to each pressure discharge port.
|
| 4. |
Measure the hydraulic pressure at each port under the conditions
given in the standard hydraulic pressure table, and check that the measured
values are within the standard value ranges.
|
| 5. |
If a value is outside the standard range, correct the problem
while referring to the hydraulic pressure test diagnosis table.
|
|
1. RED pressure port 2. OD pressure port 3. 2/4 pressure port 4. REV pressure port |
5. DA pressure port 6. UD pressure port 7. LR pressure port 8. DR pressure port |
Standard Hydraulic Pressure Table


