Inspection
Compression Pressure
|
If the there is lack of power, excessive oil consumption or poor
fuel economy, measure the compression pressure.
|
|
1. |
Warm up and stop engine.
Allow the engine to warm up to normal operating temperature.
|
|
2. |
Remove ignition coils.
|
|
3. |
Remove spark plugs.
Using a 16mm plug wrench, remove the 4 spark plugs.
|
|
4. |
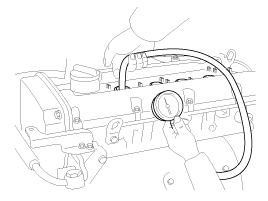
Check cylinder compression pressure
| A. |
Insert a compression gauge into the spark plug hole.
|
| B. |
Fully open the throttle.
|
| C. |
while cranking the engine, measure the compression pressure.
|
Always use a fully charged battery to obtain engine
speed of 250 rpm or more.
|
|
| D. |
Repeat steps (a) through (c) for each cylinder.
|
This measurement must be done in as short a time
as possible.
|
Compression pressure
:
1421.96kPa (14.5kgf/cm², 206.24psi)
Minimum pressure :
1274.86kPa (13.0kgf/cm², 184.90psi)
Difference between each
cylinder :
98.07kPa (1.0kgf/cm², 14.22psi) or less
|
|
| E. |
If the cylinder compression in 1 or more cylinders is
low, pour a small amount of engine oil into the cylinder through
the spark plug hole and repeat steps (a) through (c) for cylinders
with low compression.
|
|
• |
If adding oil helps the compression, it is likely
that the piston rings and/or cylinder bore are worn
or damaged.
|
|
• |
If pressure stays low, a valve may be sticking
or seating is improper, or there may be leakage past
the gasket.
|
|
|
|
5. |
Reinstall spark plugs.
|
|
6. |
Install ignition coils.
|
Timing Belt Tension Adjustment
|
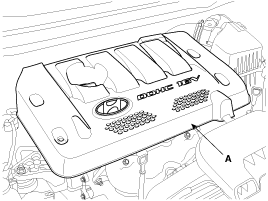
1. |
Remove the engine cover (A).
|
|
2. |
Remove RH front wheel.
|
|
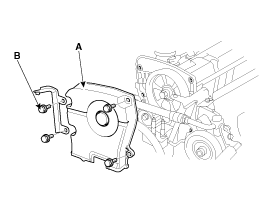
3. |
Remove the 4bolts (B) and timing belt upper cover (A).
|
|
4. |
Slacken the tensioner bolt.
|
When check the timing belt tension or install the timing
belt tensioner, must it the engine oil temperature is between
15°C(59°F) and 25°C(77°F).
|
|
|
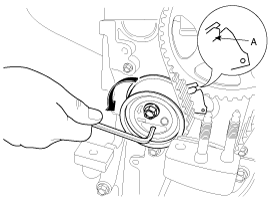
5. |
Using a hex wrench, turn the adjuster counterclockwise to make
the indicator of the arm (A) located at the center of the base notch.
|
Do not rotate the adjuster clockwise.
It will result in auto tensioner's functional problem.
|
|
|
6. |
Tightening tensioner bolt with fixing the indicator not to move.
Tightening torque
Tensioner bolt :
22.6 ~ 28.4Nm (2.3 ~ 2.9kgf.m, 16.6 ~ 21.0lb-ft)
|
|
|
7. |
Turn the crankshaft two revolutions in the operating direction
(clockwise) and check that the indicator is in the center of base.
|
|
8. |
If the indicator is not located at the center of base, slacken
the bolt and repeat the above procedure.
|
|
9. |
Install the timing belt upper cover (A) with the four bolts (B).
Tightening torque :
7.8 ~ 9.8Nm (0.8 ~ 1.0kgf.m, 5.8 ~ 7.2lb-ft)
|
|
|
10. |
Install RH front wheel.
|
|
11. |
Install engine cover (A) with the four bolts.
|
Valve Clearance Inspection And Adjustment
MLA (Mechanical Lash Adjuster)
|
Inspect and adjust the valve clearance when the engine is cold
(Engine coolant temperature : 20°C) and cylinder head is installed on
the cylinder block.
|
|
1. |
Remove the engine cover (A).
|
|
2. |
Remove the upper timing belt cover (A).
| A. |
Loosen the upper timing cover bolts and then remove the
cover.
|
|
|
3. |
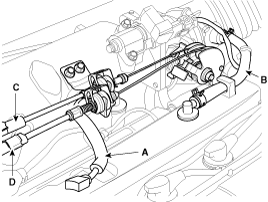
Remove the cylinder head cover.
| A. |
Disconnect the spark plug cables and do not pull on the
spark plug by force.
|
Pulling on or bending the cables may damage the
connductor inside.
|
|
| B. |
Disconnect the P.C.V hose (A) and the breather hose (B)
from the cylinder head cover.
|
| C. |
Disconnect the accelerater cable (C) and the auto-cruise
cable(D) from the cylinder head cover.
|
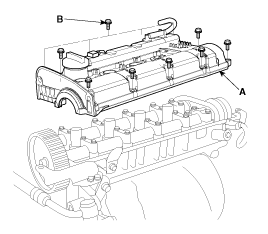
| D. |
Loosen the cylinder head cover bolts (B) and then remove
the cover (A) and gasket.
|
|
|
4. |
Set No. 1 cylinder to TDC/compression.
| A. |
Turn the crankshaft pulley and align its groove with the
timing mark "T" of the lower timing belt cover.

|
| B. |
Check that the hole of the camshaft timing pulley (A)
is aligned with the timing mark of the bearing cap.
If not, turn the crankshaft one revolution (360°)

|
|
|
5. |
Inspect the valve clearance
| A. |
Check only the valve indicated as shown. [No. 1 cylinder
: TDC/Compression] measure the valve clearance.
|
|
• |
Using a thickness gauge, measure the clearance
between the tappet shim and the base circle of camshaft.
|
|
• |
Record the out-of-specification valve clearance
measurements. They will be used later to determine the
required replaement adjusing shim.
Valve clearance
Specitication
Engine coolant temperature : 20°C [68°F]
Intake : 0.20mm (0.0079in.)
Exhaust : 0.28mm (0.0110in.)
Engine coolant temperature : 80°C [176°F]
Intake : 0.29mm (0.0114in.)
Exhaust : 0.34mm (0.0134in.)
Limit
Intake : 0.17 ~ 0.23mm (0.0067 ~ 0.091in.)
Exhaust : 0.25 ~ 0.31mm (0.0098 ~ 0.0122in.)
|
|
|
| B. |
Turn the crankshaft pulley one revolution (360°) and align
the groove with timing mark "T" of the lower timing belt cover.
|
| C. |
Check only valves indicated as shown. [NO. 4 cylinder
: TDC/compression]. Measure the valve clearance.
|
|
|
6. |
Adjust the intake and exhaust valve clearance.
| A. |
Turn the crankshaft so that the cam lobe of the camshaft
on the adjusting valve is upward.
|
| B. |
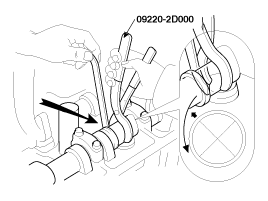
Using the SST(09220 - 2D000), press down the valve lifter
and place the stopper between the camshaft and valve lifter
and remove the special tool.
|
| C. |
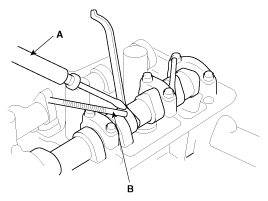
Remove the adjusting shim with a small screw driver (A)
and magnet(B).
|
| D. |
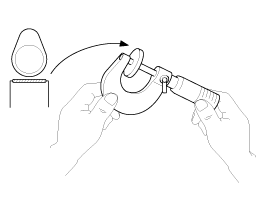
Measure the thickness of the removed shim using a micrometer.
|
| E. |
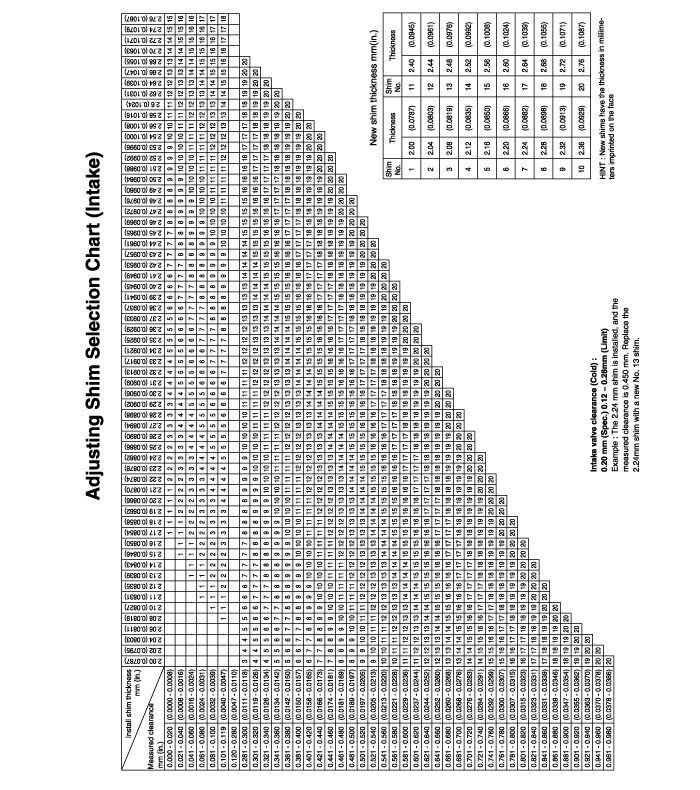
Calculate the thickness of a new shim so that the valve
clearance comes within the specificified value.
Valve clearance (Engine
coolant temperature : 20°C)
T : Thickness of removed shim
A : Measured valve clearance
N : Thickness of new shim
Intake : N = T + [A - 0.20mm(0.0079in.)]
Exhaust : N = T + [A-0.28mm (0.0110in.)]
|
|
| F. |
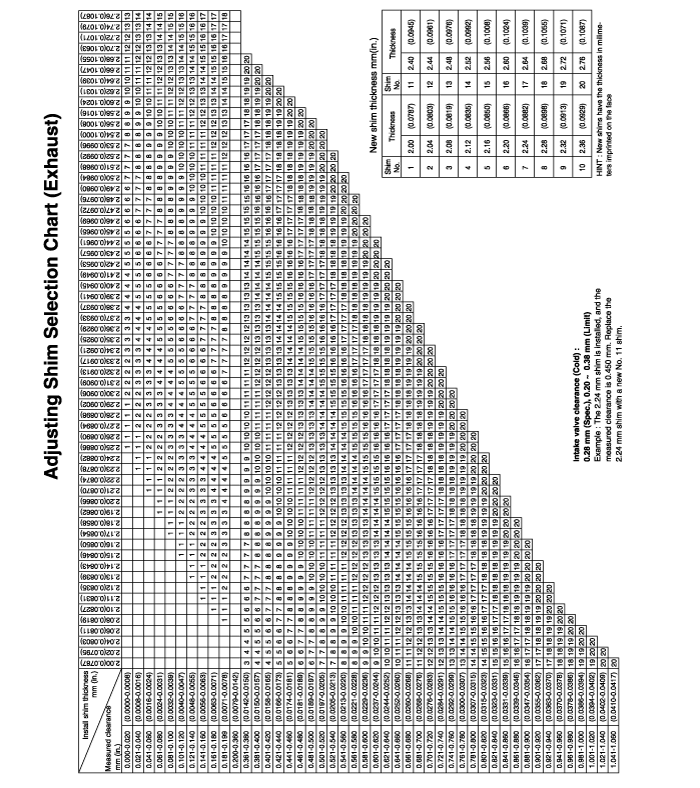
Select a new shim with a thickness as close as possible
to the caculated value. [Refer to the Adjusting shim selection
chart]
|
Shims are available in 20size increments of 0.04mm
(0.0016in.) from 2.00mm (0.079in.) to 2.76mm (0.1087in.)
|
|
| G. |
Place a new adjusting shim on the valve lifter.
|
| H. |
Using the SST(09220 - 2D000), press down the valve lifter
and remove the stopper.
|
| I. |
Recheck the valve clearance.
Valve clearance (Engine
coolant temperature : 20°C)
[Specification]
Intake : 0.20mm (0.0079in.)
Exhaust : 0.28mm (0.0110in.)
[Limit] (After adjusting valve clearance)
Intake : 0.17 ~ 0.23mm (0.0067 ~ 0.0091in.)
Exhaust : 0.25 ~ 0.31mm (0.0098 ~ 0.0122in.)
|
|
|
Specifications
Description
Specifications
Limit
General
Type
In-line, Double Overhead Camshaft
...
Troubleshooting
Symption
Suspect area
Remedy
Engine misfire with abnormal internal lower engine noises.
Loose or improperly installed ...
 Hyundai Elantra: Repair procedures

