Engine removal is not required for this procedure.
| • |
Use fender covers to avoid damaging painted surfaces.
|
| • |
To avoid damaging the cylinder head, wait until the engine
coolant temperature drops below normal temperature (20°C [68°F])
before removing it.
|
| • |
When handling a metal gasket, take care not to fold the
gasket or damage the contact surface of the gasket.
|
| • |
To avoid damage, unplug the wiring connectors carefully
while holding the connector portion.
|
|
| • |
Mark all wiring and hoses to avoid misconnection.
|
| • |
Turn the crankshaft pulley so that the No. 1 piston is
at TDC (Top dead center).
|
|
| 1. |
Disconnect the battery negative terminal. (Refer to Engine and
transaxle assembly in this group)
|
| 2. |
Remove the RH front wheel. (Refer to SS group – “Wheel”)
|
| 3. |
Remove the RH under cover. (Refer to Engine and transaxle assembly
in this group)
|
| 4. |
Remove the engine cover. (Refer to Engine and transaxle assembly
in this group)
|
| 5. |
Remove the air duct and the air cleaner assembly. (Refer to Intake
and exhaust system in this group)
|
| 6. |
Loosen the drain plug, and drain the engine coolant. Remove the
radiator cap to help drain the coolant faster. (Refer to Cooling system
in this group)
|
| 7. |
Disconnect the radiator upper hose and lower hose. (Refer to Cooling
system in this group)
|
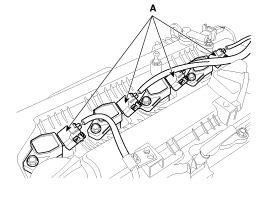
| 8. |
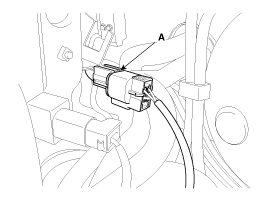
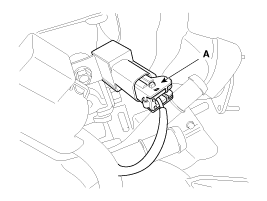
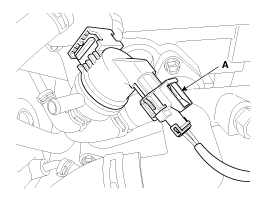
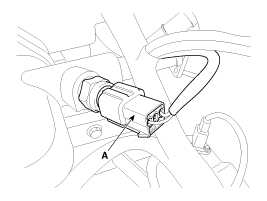
Disconnect the wiring connectors and harness clamps, and then
remove the wiring and protectors from the cylinder head and the intake
manifold.
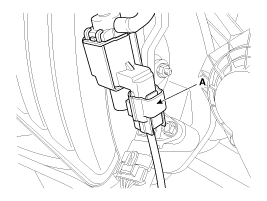
| (1) |
The intake OCV (Oil control valve) connector (A)
|
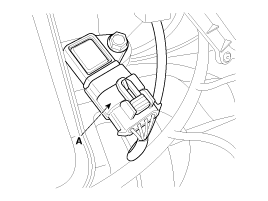
| (2) |
The exhaust OCV (Oil control valve) connector (A)
|
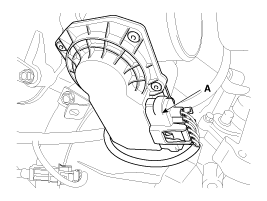
| (3) |
The alternator connector (A)

|
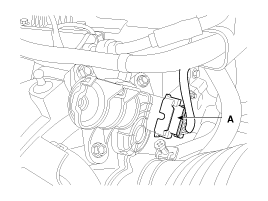
| (4) |
The ignition coil connectors (A)
|
| (5) |
The intake CMPS (Camshaft position sensor) connector (A)
|
| (6) |
The exhaust CMPS (Camshaft position sensor) connector
(B)
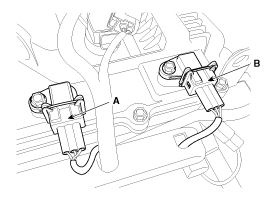
|
| (7) |
The injector connectors (A)

|
| (8) |
The front and/or rear HO2S (Heated oxygen sensor connectors
(A)
[ULEV]
[SULEV]

|
| (9) |
The condenser connector (A)
|
| (10) |
The PCSV (Purge control solenoid valve) connector (A)
|
| (11) |
The ECTS (Engine coolant temperature sensor) connector
(A)
|
| (12) |
The VIS (Variable Intake System) connector (A)
|
| (13) |
The MAPS (Manifold absolute pressure sensor) & IATS (Intake
air temperature sensor) connector (A)
|
| (14) |
The ETC (Electronic throttle control) connector (A)
|
| (15) |
The VCMA (Variable charge motion actuator) connector (A)
|
|
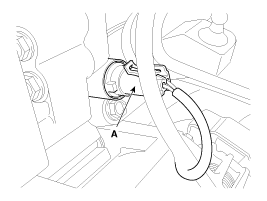
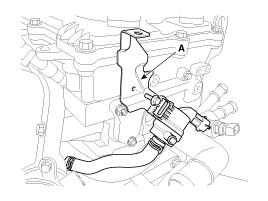
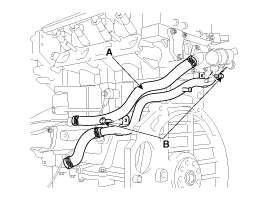
| 9. |
Disconnect the brake booster vacuum hose (A) and the heater hoses
(B).
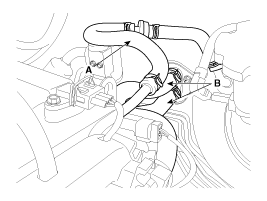
|
| 10. |
Disconnect the fuel hose (A) and PCSV (Purge control solenoid
valve) hose (B).
|
| 11. |
Remove the injector & rail assembly (A). (Refer to FL – “Injector”)
|
| 12. |
Remove the intake and exhaust manifold. (Refer to Intake and exhaust
system in this group)
|
| 13. |
Remove the timing chain including the drive belt, the cylinder
head cover, the alternator and the timing chain cover. (Refer to Timing
system in this group)
|
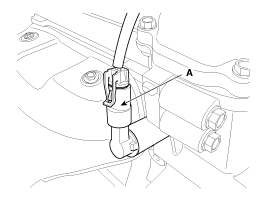
| 14. |
Remove the vacuum pipe (A).

|
| 15. |
Remove the condenser (A).
|
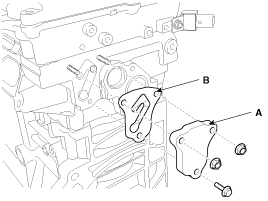
| 16. |
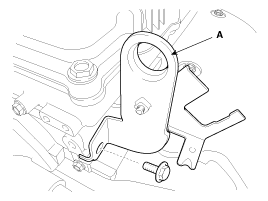
Remove the PCSV bracket (A).
|
| 17. |
Remove the intake CVVT assembly (A) and exhaust CVVT assembly
(B).
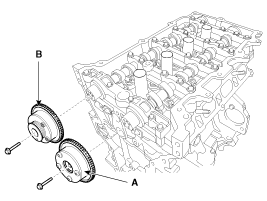
|
When removing the CVVT assembly bolt, hold the camshaft
with a wrench to prevent the camshaft from rotating.
|
|
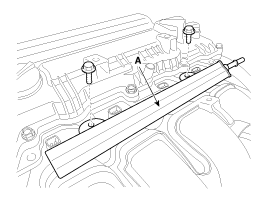
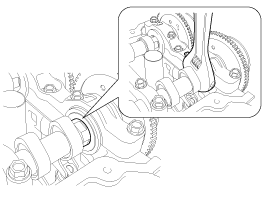
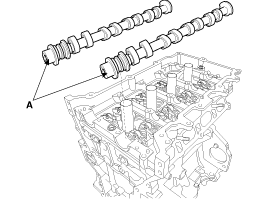
| 18. |
Remove the camshaft.
| (1) |
Remove the camshaft bearing cap (A) by loosening the bolts
in the sequence as shown.
|
| (2) |
Remove the camshafts (A).
|
|
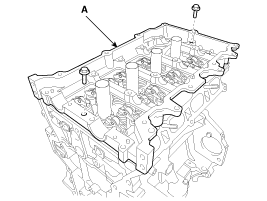
| 19. |
Remove the cam carrier (A).
|
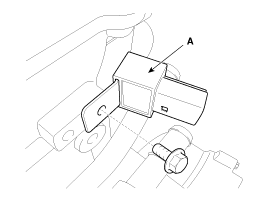
| 20. |
Remove the HLA (Hydraulic lash adjuster) (A) and the swing arm
(B).
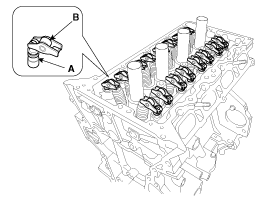
|
The HLA and swing arm should be kept together as pairs
during storage after removal and reinstallation.
|
|
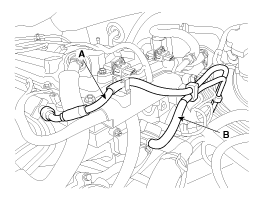
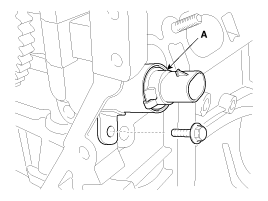
| 21. |
Disconnect the bypass hose (A).
|
| 22. |
Unfasten the heater pipe mounting bolts (B).
|
| 23. |
Remove the water temperature control assembly.
(Refer to Cooling system in this group)
|
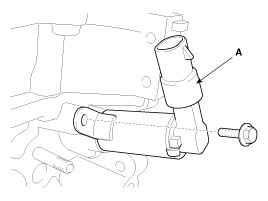
| 24. |
Remove the oil control adapter (A) with the gasket (B).
|
| 25. |
Remove the intake OCV (Oil control valve) (A).
|
| 26. |
Remove the exhaust OCV (Oil control valve) (A).
|
| 27. |
Remove the rear engine hanger (A).
|
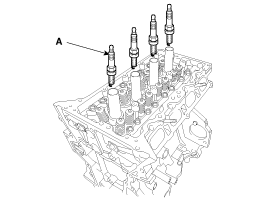
| 28. |
Remove the spark plugs (A). (Refer to EE group – “Ignition system”)
|
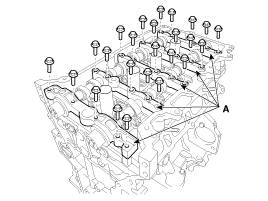
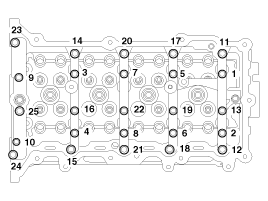
| 29. |
Remove the cylinder head.
| (1) |
Using bit socket (12PT), uniformly loosen and remove the
cylinder head bolts, in several passes, in the sequence as shown.
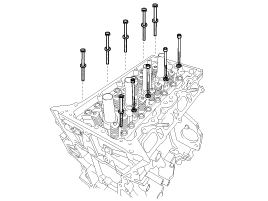
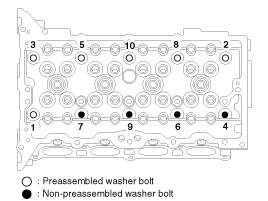
|
Head warpage or cracking could result from removing
bolts in an incorrect order.
|
|
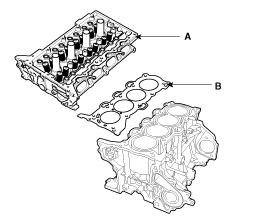
| (2) |
Lift the cylinder head (A) from the dowels on the cylinder
block and place the cylinder head on wooden blocks on a bench.
|
Be careful not to damage the contact surfaces
of the cylinder head and cylinder block.
|
|
| (3) |
Remove the cylinder head gasket (B).
|
|
Identify, valves and valve springs as they are removed so that
each item can be reinstalled in its original position.
...
 Hyundai Elantra: Removal

