| • |
Thoroughly clean all parts to be assembled.
|
| • |
Always use new cylinder head and manifold gaskets.
|
| • |
Always use new cylinder head bolts.
|
| • |
The cylinder head gasket is a metal gasket. Take care
not to bend it.
|
| • |
Rotate the crankshaft to set the No.1 piston at TDC (Top
dead center) on compression stroke.
|
|
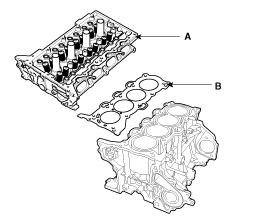
| 1. |
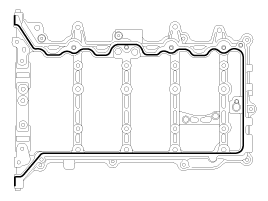
Install the cylinder head gasket (B) on the cylinder block.
| (1) |
Remove hardening sealant, oil, dust, moisture and harmful
foreign materials from the cylinder block and the cylinder head.
|
| (2) |
Apply liquid gasket on the edge of the cylinder block.
|
| (3) |
Install the cylinder head gasket with the dowel pins of
the cylinder block.
|
| (4) |
Apply liquid gasket on the edge of the cylinder head gasket.
|
Apply liquid gasket on the edge of the cylinder
block and cylinder head gasket.
|
Sealant: Threebond 1217H or equivalent
|
|
Assemble the cylinder head gasket and the cylinder
head within 5 minutes after applying sealant.
|
|
|
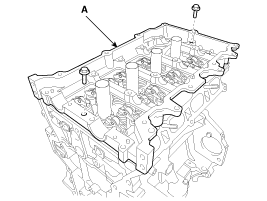
| 2. |
Place the cylinder head (A) carefully to protect damage to the
head gasket during installation.
|
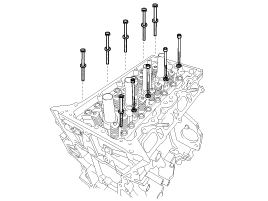
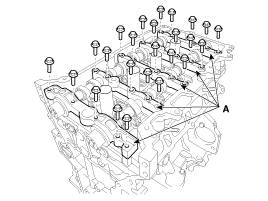
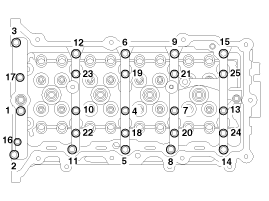
| 3. |
Install the cylinder head bolts with washers.
Using SST (09221-4A000), install and tighten the 10 cylinder head
bolts, in several passes, in the sequence as shown.
Tightening torque
1st step:
32.4 ~ 36.3 N.m (3.3 ~ 3.7 kgf.m, 23.9 ~ 26.8 lb-ft)
2nd step: 90~95°
3rd step: 90~95°
|
| • |
Do not reuse the cylinder head bolts.
|
| • |
Do not apply engine oil on the bolt threads to
achieve correct toruqe.
|
| • |
Remove the extruded sealant within 5 minutes after
installing cylinder head bolts.
|
| • |
The engine running or pressure test should not
be performed within 30 minutes after installing cylinder
head bolts.
|
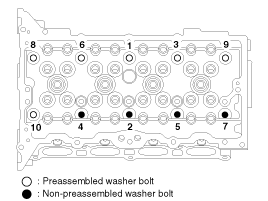
| • |
Be careful not to change the installing position
of the preassembled washer bolts and non-preassembled
washer bolts.
|
| • |
When installing the washer of the non-preassembled
washer bolts, the round and chamfer of washers should
be faced up.
|
|
|
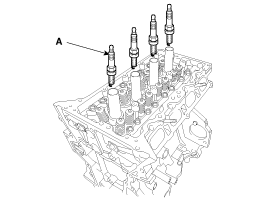
| 4. |
Install the spark plugs (A). (Refer to EE group – “Ignition system”)
Tightening torque:
14.7 ~ 24.5 N.m (1.5 ~ 2.5 kgf.m, 10.8 ~ 18.1 lb-ft)
|
|
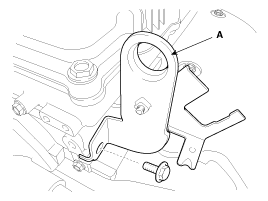
| 5. |
Install the rear engine hanger (A).
Tightening torque:
34.3 ~ 39.2 N.m (3.5 ~ 4.0 kgf.m, 25.3 ~ 28.9 lb-ft)
|
|
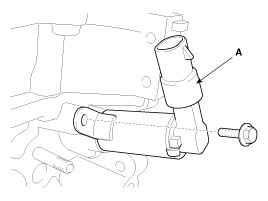
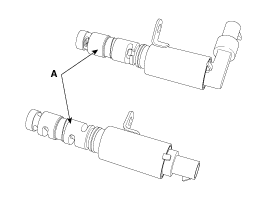
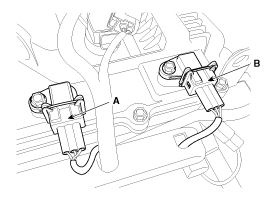
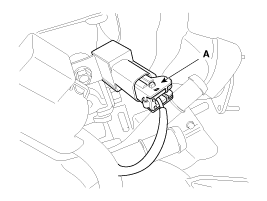
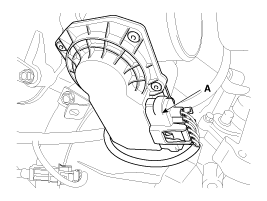
| 6. |
Install the exhaust OCV (Oil control valve) (A).
Tightening torque:
9.8 ~ 11.8 N.m (1.0 ~ 1.2 kgf.m, 7.2 ~ 8.7 lb-ft)
|
|
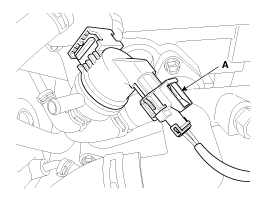
| 7. |
Install the intake OCV (Oil control valve) (A).
Tightening torque:
9.8 ~ 11.8 N.m (1.0 ~ 1.2 kgf.m, 7.2 ~ 8.7 lb-ft)
|
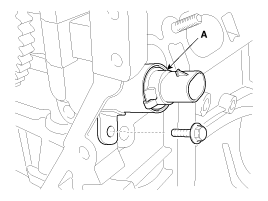
| • |
Do not reuse the OCV when dropped.
|
| • |
Keep the OCV filter clean.
|
| • |
Do not hold the OCV sleeve (A) during servicing.
|
| • |
When the OCV is installed on the engine, do not
move the engine with holding the OCV yoke.
|
|
|
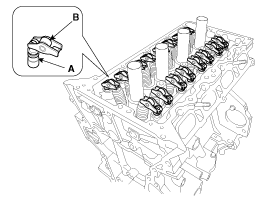
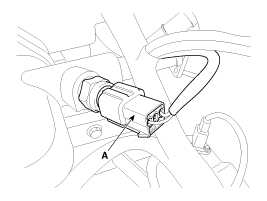
| 8. |
Install the oil control adapter (A) with a new gasket (B).
Tightening torque:
9.8 ~ 11.8 N.m (1.0 ~ 1.2 kgf.m, 7.2 ~ 8.7 lb-ft)
|
|
| 9. |
Install the water temperature control assembly.
(Refer to Cooling system in this group)
|
| 10. |
Fasten the heater pipe mounting bolts (B).
Tightening torque:
19.6 ~ 23.5 N.m (2.0 ~ 2.4 kgf.m, 14.5 ~ 17.4 lb-ft)
|
|
Do not reuse the seal bolts.
|
|
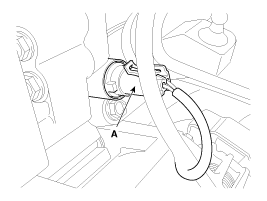
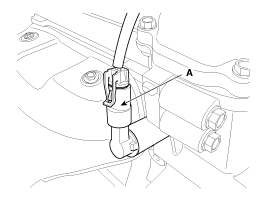
| 11. |
Connect the bypass hose (A).
|
| 12. |
Install the HLA (Hydraulic lash adjuster)(A) and the swing arm
(B).
| (1) |
When installing HLA, it should be held upright so that
engine oil in HLA may not spill and assured that dust does not
adhere to HLA.
|
| (2) |
HLA should be inserted carefully to the cylinder head
not to spill engine oil.
|
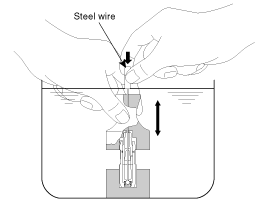
In case of spilling, air bleed should be done
in accordance with the air bleed procedure. Stroke HLA
in diesel oil 4 ~ 5 times by pushing its cap while pushing
the ball down slightly with a hard steel wire. (Take
care not to severely push a hard steel wire down since
ball is several grams.)
|
|
|
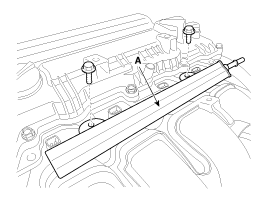
| 13. |
Install the cam carrier.
| (1) |
Using a gasket scraper, remove all the old packing material
from the gasket surfaces.
|
| (2) |
The sealant locations on the cam carrier and the cylinder
head must be free of harmful foreign materials, oil, dust and
moisture. Spray cleaner on the surface and wipe with a clean
duster.
|
| (3) |
After applying liquid sealant on the bottom surface of
the cam carrier, assemble the cam carrier. Continuous bead of
sealant should be applied to prevent any path from oil leakage.
Bead width: 2.5 ~ 3.5 mm (0.10 ~
0.14 in.)
Sealant: Threebond 1217H or equivalent
|
|
| (4) |
Place the cam carrier (A) on the cylinder head. The dowel
pins on the cam carrier and holes on the cylinder head should
be used as a reference in order to assemble the cam carrier
in exact position.
|
| (5) |
Fasten the cam carrier bolts.
Tightening torque:
18.6 ~ 22.6 N.m (1.9 ~ 2.3 kgf.m, 13.7 ~ 16.6
lb-ft)
|
| •
|
Assemble the cam carrier within 5 minutes
after applying sealant.
|
| •
|
Assemble the camshaft bearing cap within
5 minutes after assembling the cam carrier.
|
| •
|
The engine running or pressure test should
not be performed within 30 minutes after assembling
the cam carrier.
|
|
|
|
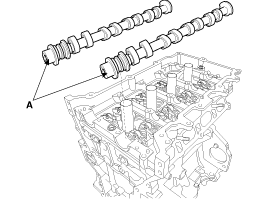
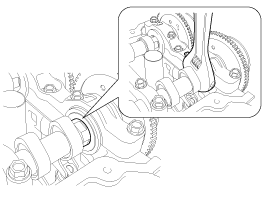
| 14. |
Install the camshafts.
| (1) |
Place the intake and exhaust camshafts (A) on the cam
carrier.
|
| (2) |
Install the camshaft bearing cap (A).
Tighten the bolts, in several passes, in the sequence
as shown.
Tightening torque
M6 bolts:
11.8 ~ 13.7 N.m (1.2 ~ 1.4 kgf.m, 8.7 ~ 10.1 lb-ft)
M8 bolts:
18.6 ~ 22.6 N.m (1.9 ~ 2.3 kgf.m, 13.7 ~ 16.6
lb-ft)
|
|
Be careful not to change the position and direction
of bearing caps.
|
|
|
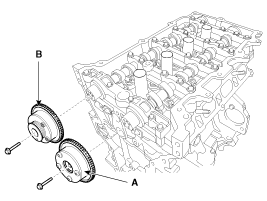
| 15. |
Install the intake CVVT assembly (A) and exhaust CVVT assembly
(B).
Tightening torque:
64.7 ~ 76.5 N.m (6.6 ~ 7.8 kgf.m, 47.7 ~ 56.4 lb-ft)
|
|
When removing the CVVT assembly bolt, hold the camshaft
with a wrench to prevent the camshaft from rotating.
|
|
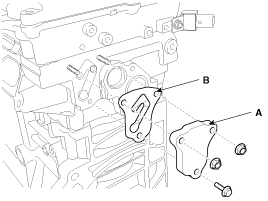
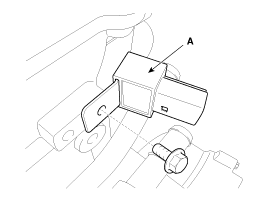
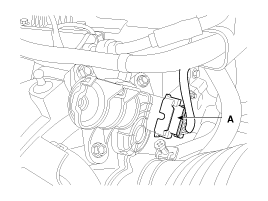
| 16. |
Install the PCSV bracket (A).
Tightening torque:
9.8 ~ 11.8 N.m (1.0 ~ 1.2 kgf.m, 7.2 ~ 8.7 lb-ft)
|
|
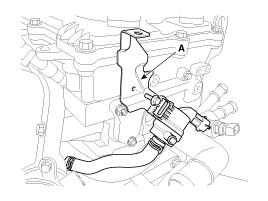
| 17. |
Install the condenser (A).
Tightening torque:
9.8 ~ 11.8 N.m (1.0 ~ 1.2 kgf.m, 7.2 ~ 8.7 lb-ft)
|
|
| 18. |
Install the vacuum pipe (A).
Tightening torque:
9.8 ~ 11.8 N.m (1.0 ~ 1.2 kgf.m, 7.2 ~ 8.7 lb-ft)
|

|
| 19. |
Install the timing chain including the drive belt, the cylinder
head cover, the alternator and the timing chain cover. (Refer to Timing
system in this group)
|
| 20. |
Install the intake and exhaust manifold.
(Refer to Intake and exhaust system in this group)
|
| 21. |
Install the injector & rail assembly (A). (Refer to FL – “Injector”)
Tightening torque:
18.6 ~ 23.5 N.m (1.9 ~ 2.4 kgf.m, 13.7 ~ 17.4 lb-ft)
|
|
| 22. |
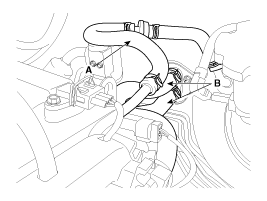
Connect the fuel hose (A) and PCSV (Purge control solenoid valve)
hose (B).
|
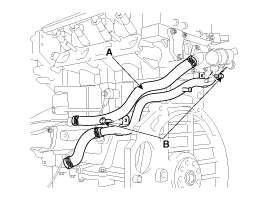
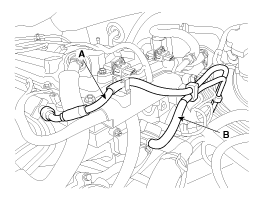
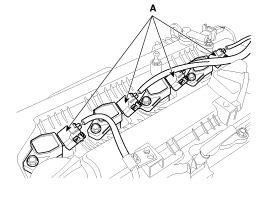
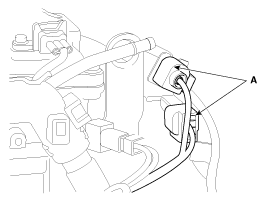
| 23. |
Connect the brake booster vacuum hose (A) and the heater hoses
(B).
|
When installing the heater hoses, install as shown in
illustrations.
|
|
| 24. |
Install the wiring and protectors on the cylinder head and the
intake manifold and then connect the wiring connectors and harness clamps.
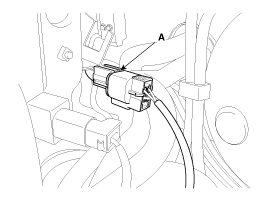
| (1) |
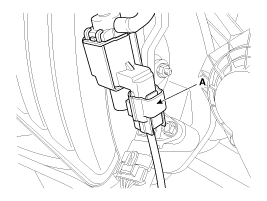
The intake OCV (Oil control valve) connector (A)
|
| (2) |
The exhaust OCV (Oil control valve) connector (A)
|
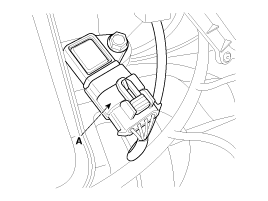
| (3) |
The alternator connector (A)

|
| (4) |
The ignition coil connectors (A)
|
| (5) |
The intake CMPS (Camshaft position sensor) connector (A)
|
| (6) |
The exhaust CMPS (Camshaft position sensor) connector
(B)
|
| (7) |
The injector connectors (A)

|
| (8) |
The front and/or rear HO2S (Heated oxygen sensor connectors
(A)
[ULEV]
[SULEV]
|
| (9) |
The condenser connector (A)
|
| (10) |
The PCSV (Purge control solenoid valve) connector (A)
|
| (11) |
The ECTS (Engine coolant temperature sensor) connector
(A)
|
| (12) |
The VIS (Variable Intake System) connector (A)
|
| (13) |
The MAPS (Manifold absolute pressure sensor) & IATS (Intake
air temperature sensor) connector (A)
|
| (14) |
The ETC (Electronic throttle control) connector (A)
|
| (15) |
The VCMA (Variable charge motion actuator) connector (A)
|
|
| 25. |
Connect the radiator upper hose and lower hose. (Refer to Cooling
system in this group)
|
| 26. |
Install the air duct and the air cleaner assembly. (Refer to Intake
and exhaust system in this group)
|
| 27. |
Install the engine cover. (Refer to Engine and transaxle assembly
in this group)
|
| 28. |
Install the RH under cover. (Refer to Engine and transaxle assembly
in this group)
|
| 29. |
Install the RH front wheel. (Refer to SS group – “Wheel”)
|
| 30. |
Connect the battery negative terminal. (Refer to Engine and transaxle
assembly in this group)
|
| 31. |
Add all the necessary fluids and check for leaks.
Connect GDS. Check for codes, note, and clear. Recheck.
|
| • |
Refill engine with engine oil.
|
| • |
Refill a radiator and a reservoir tank with engine coolant.
|
| • |
Clean battery posts and cable terminals and assemble.
|
| • |
Inspect for fuel leakage.
|
| - |
After assembling the fuel line, turn on the ignition switch
(do not operate the starter) so that the fuel pump runs for
approximately two seconds and fuel line pressurizes.
|
| - |
Repeat this operation two or three times, then check for
fuel leakage at any point in the fuel line.
|
| • |
Bleed air from the cooling system.
|
| - |
Start engine and let it run until it warms up (until the
radiator fan operates 3 or 4 times).
|
| - |
Turn off the engine. Check the level in the radiator,
add coolant if needed. This will allow trapped air to be removed
from the cooling system.
|
| - |
Put radiator cap on tightly, then run the engine again
and check for leaks.
|
|
•
Thoroughly clean all parts to be assembled.
•
Before instal ...
 Hyundai Elantra: Installation

