Cylinder Head
| 1. |
Inspect for flatness.
Using a precision straight edge and feeler gauge, measure the
contacting surface of the cylinder block and the manifolds for warpage.
Flatness of cylinder head gasket surface:
Less than 0.05 mm (0.0020 in.) for total area
Less than 0.02 mm (0.0008 in.) for a section of 100 mm
(3.9370 in.) X 100 mm (3.9370 in.)
|
Flatness of manifold mounting surface:
Less than 0.10 mm (0.0039 in.)
|
|
| 2. |
Inspect for cracks.
Check the combustion chamber, intake ports, exhaust ports and
cylinder block surface for cracks. If cracked, replace the cylinder
head.
|
Valve And Valve Spring
| 1. |
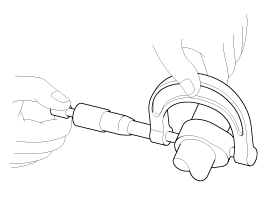
Inspect valve stems and valve guides.
| (1) |
Using a caliper gauge, measure the inside diameter of
the valve guide.
Valve guide inner diameter
Intake: 5.500 ~ 5.512 mm (0.21654 ~ 0.21701 in.)
Exhaust: 5.500 ~ 5.512 mm (0.21654 ~ 0.21701 in.)
|

|
| (2) |
Using a micrometer, measure the diameter of the valve
stem.
Valve stem outer diameter
Intake: 5.465 ~ 5.480 mm (0.21516 ~ 0.21575 in.)
Exhaust: 5.458 ~ 5.470 mm (0.21488 ~ 0.21535 in.)
|
|
| (3) |
Subtract the valve stem diameter measurement from the
valve guide inside diameter measurement.
If the clearance is greater than specification, replace
the valve or the cylinder head.
Valve stem-to-guide clearance
[Standard]
Intake : 0.020 ~ 0.047 mm (0.00079 ~ 0.00185 in.)
Exhaust : 0.030 ~ 0.054 mm (0.00118 ~ 0.00213
in.)
|
|
|
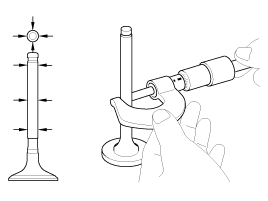
| 2. |
Inspect the valves.
| (1) |
Check the valve is ground to the correct valve face angle.
|
| (2) |
Check that the surface of the valve for wear.
If the valve face is worn, replace the valve.
|
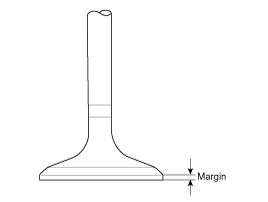
| (3) |
Check the valve head margin thickness.
If the margin thickness is less than specification, replace
the valve.
Margin
[Standard]
Intake: 1.30 mm (0.0512 in.)
Exhaust: 1.26 mm (0.0496 in.)
|
|
| (4) |
Check the valve length.
Valve length
[Standard]
Intake: 102.22 mm (4.0244 in.)
Exhaust: 104.04 mm (4.0961 in.)
[Limit]
Intake: 101.97 mm (4.0146 in.)
Exhaust: 103.79 mm (4.0862 in.)
|
|
| (5) |
Check the surface of the valve stem tip for wear.
If the valve stem tip is worn, replace the valve.
|
|
| 3. |
Inspect the valve seats and the valve guides.
| (1) |
Check the valve seat for evidence of overheating and improper
contact with the valve face.
If the valve seat is worn, replace the cylinder head.
|
| (2) |
Check the valve guide for wear.If the valve guide is worn,
replace the cylinder head.
|
|
| 4. |
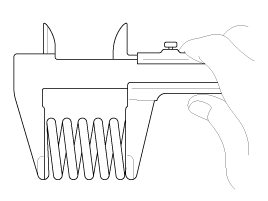
Inspect the valve springs.
| (1) |
Using a steel square, measure the out-of-square of valve
spring.
|
| (2) |
Using a vernier calipers, measure the free length of valve
spring.
If the free length is not as specified, replace the valve
spring.
Valve spring
[Standard]
Free height: 45.93 mm (1.8083 in.)
Out-of-square : Less than 1.5°
|
|
|
Camshaft
| 1. |
Inspect the cam lobes.
Using a micrometer, measure the cam lobe height.
If the cam lobe height is less than specification, replace the
camshaft.
Cam height
Intake: 39.0 mm (1.5354 in.)
Exhaust: 38.7 mm (1.5236 in.)
|
|
| 2. |
Check the surface of the camshaft journal for wear.
If the journal is worn excessively, replace the camshaft.
|
| 3. |
Inspect the camshaft journal clearance.
| (1) |
Clean the bearing caps and camshaft journals.
|
| (2) |
Place the camshafts on the cylinder head.
|
| (3) |
Lay a strip of plastigage across each of the camshaft
journal.
|
| (4) |
Install the bearing caps and tighten the bolts with specified
torque.
Tightening torque
M6 bolts:
11.8 ~ 13.7 N.m (1.2 ~ 1.4 kgf.m, 8.7 ~ 10.1 lb-ft)
M8 bolts:
18.6 ~ 22.6 N.m (1.9 ~ 2.3 kgf.m, 13.7 ~ 16.6
lb-ft)
|
|
Do not turn the camshaft.
|
|
| (5) |
Remove the bearing caps.
|
| (6) |
Measure the plastigage at its widest point.
If the oil clearance is greater than specification, replace
the camshaft. If necessary, replace the bearing caps and cylinder
head as a set.
Bearing oil clearance
Standard:
0.032 ~ 0.062 mm (0.00126 ~ 0.00244 in.)
|
|
|
| 4. |
Inspect the camshaft end play.
| (1) |
Install the camshaft bearing caps.
|
| (2) |
Using a dial indicator, measure the end play while moving
the camshaft back and forth.
If the end play is greater than specification, replace
the camshaft.
If necessary, replace the bearing caps and cylinder head
as a set
Camshaft end play
Standard:
0.10 ~ 0.19mm (0.0039 ~ 0.0075 in.)
|
|
| (3) |
Remove the camshafts.
|
|
CVVT (Continuous Variable Valve Timing) Assembly
| 1. |
Inspect CVVT assembly.
| (1) |
Fix the camshaft using a vise.
Be careful not to damage the cam lobe and journal.
|
| (2) |
Check that the CVVT assembly will not turn.
|
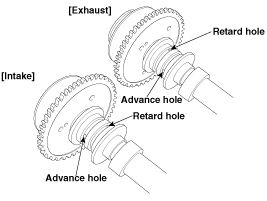
| (3) |
Apply vinyl tape to the retard hole like the one indicated
by the arrow in the illustration.
Verify that the tape holds and put air through the port
of the camshaft.
|
| (4) |
Wind tape around the tip of the air gun and apply air
of approx. 150 kPa (1.5 kgf/cm², 21 psi) to the port of the
camshaft.
Perform this in order to release the lock pin for the
maximum delay angle locking.
|
Wrap around it with a shop rag and the likes to
prevent oil from splashing.
|
|
| (5) |
With air applied, as in step (3), turn the CVVT assembly
to the advance angle side (the arrow marked direction in the
illustration) with your hand.
Depending on the air pressure, the CVVT assembly will
turn to the advance side without applying force by hand. Also,
under the condition that the pressure can be hardly applied
because of the air leakage from the port, there may be the case
that the lock pin could be hardly released.
|
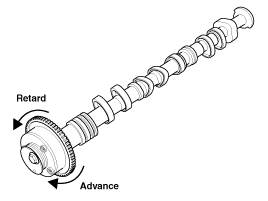
| (6) |
Turn the CVVT assembly back and forth and check the movable
range and that there is no disturbance.
Standard:
Should move smoothly in a range from about
25.0° (Intake) / 20.0° (Exhaust)
|
|
| (7) |
Turn the intake CVVT assembly with your hand and lock
it at the maximum retard angle position (counter clockwise).
|
| (8) |
Turn the exhaust CVVT assembly with your hand and lock
it at the maximum advance angle position (clockwise).
|
|
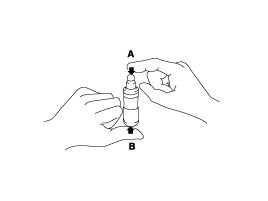
HLA (Hydraulic Lash Adjuster)
With the HLA filled with engine oil, hold A and press B by hand.
If B moves, replace the HLA.
Problem
|
Possible cause
|
Action
|
1. Temporary noise when starting a cold engine
|
Normal
|
This noise will disappear after the oil in the engine reaches the
normal pressure.
|
2. Continuous noise when the engine is started after parking more
than 48 hours
|
Oil leakage of the high pressure chamber on the HLA, allowing air
to get in
|
Noise will disappear within 15 minutes when engine runs at 2000-3000
rpm.
If it doesn’t disappear, refer to step 7 below.
|
3. Continuous noise when the engine is first started after rebuilding
cylinder head
|
Insufficient oil in cylinder head oil gallery
|
4. Continuous noise when the engine is started after excessively cranking
the engine by the starter motor or band
|
| • |
Oil leakage of the high-pressure chamber in the HLA, allowing
air to get in
|
| • |
Insufficient oil in the HLA
|
|
5. Continuous noise when the engine is running after changing the
HLA
|
|
Do not run engine at a speed higher than 3000 rpm, as
this may damage the HLA.
|
|
6. Continuous noise during idle after high engine speed
|
Engine oil level too high or too low
|
| • |
Drain or add oil as necessary.
|
|
Excessive amount of air in the oil at high engine speed
|
Check oil supply system.
|
Deteriorated oil
|
Check oil quality.
If deteriorated, replace with specified type.
|
7. Noise continues for more than 15 minutes
|
Low oil pressure
|
Check oil pressure and oil supply system of each part of engine.
|
Faulty HLA
|
Remove the cylinder head cover and press HLA down by hand.
If it moves, replace the HLA.
|
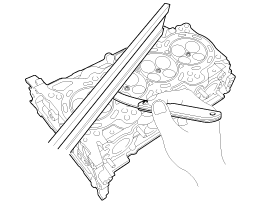
Identify, valves and valve springs as they are removed so that
each item can be reinstalled in its original position.
...
•
Thoroughly clean all parts to be assembled.
•
Before instal ...
 Hyundai Elantra: Inspection

