Hyundai Elantra: Starter. Repair procedures
Replacement
| 1. |
Disconnect the battery ground cable.
|
| 2. |
Remove the speedometer cavble and the shift cable.
|
| 3. |
Disconnect the starter motor connector and terminal.
|
| 4. |
Remove the starter motor assembly.
|
| 5. |
Installation is the reverse order of removal.
|
Inspection
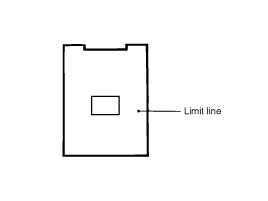
Brush
A brush worn down to the wear limit line should be replaced.
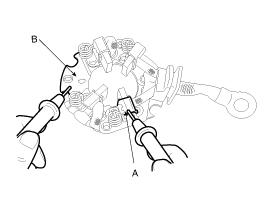
Brush Holder
Make sure there is no continuity between the (+) brush holder (A) and
(-) plate (B). If there is continuity, replace the brush holder assembly.
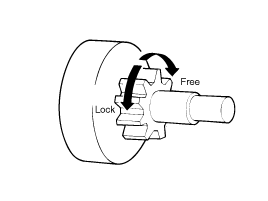
Overrunning Clutch
Inspect the pinion and spline teeth for wear or damage.Replace if damaged.
Also inspect the flywheel ring gearfor damage.
Rotate the pinion. It should turn freely in a clockwise direction,and
lock when turned counterclockwise.
Pinion Gap Adjustment
| 1. |
Disconnect the wire from the M-terminal.
|
| 2. |
Connect a 12V battery between the S-terminal and the M-terminal.
|
| 3. |
Set the switch to "ON", and the pinion will move out.
|
| 4. |
Check the pinion to stopper clearance (pinion gap) with a feeler
gauge. If the pinion gap is out of specification, adjust by adding or
removingwashers between the solenoid and the front bracket.
|
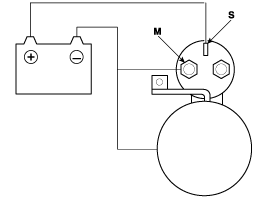
Solenoid Pull-in Test
| 1. |
Disconnect the connector from the M-terminal.
|
| 2. |
Connect a 12V battery between the S-terminal and M-terminal.
|
| 3. |
If the pinion moves out, the pull-in coil is good. If it doesn't,
replace the solenoid.
|
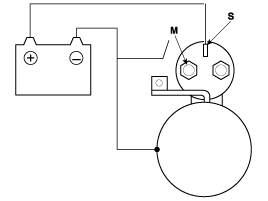
Solenoid Hold-in Test
| 1. |
Disconnect the connector from the M-terminal.
|
| 2. |
Connect a 12V battery between the S-terminal and the body.
|
| 3. |
If the pinion remains out, everything is in order. If the pinion
moves in, the hold-in circuit is open. Replace the magnetic switch.
|
Solenoid Return Test
| 1. |
Disconnect the connector from the M-terminal.
|
| 2. |
Connect a 12V battery between the M-terminal and the body.
|
| 3. |
Pull out the pinion and then release it. If the pinion returns
quickly to its original position, everything is in order. If it doesn't,
replace thesolenoid
|
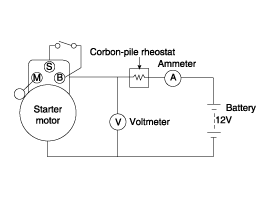
Performance Test (No-load)
| 1. |
Make the no-load circuit test as shown.
|
| 2. |
After adjusting the rheostat until the battery voltage shown on
the voltmeter reads 11.5 volts, confirm that the maximum amperage draw
is within the specifications and that the starter motor turns smoothly
and freely.
|