| • |
Thoroughly clean all parts to be assembled.
|
| • |
Before installing the parts, apply fresh engine oil to
all sliding and rotating surfaces.
|
| • |
Replace all gaskets, O-rings and oil seals with new parts.
|
|
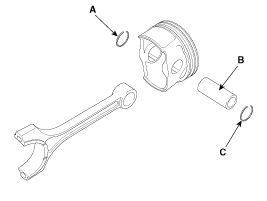
| 1. |
Assemble the piston and the connecting rod.
| (1) |
Install the snap ring (A) in one side of the piston pin
hole.
|
| (2) |
Align the piston front mark and the connecting rod front
mark.
|
| (3) |
Insert the piston pin (B) into the piston pin hole and
the small end bore of connecting rod.
|
| (4) |
Install the snap ring (C) in the other side after inserting
the piston pin.
|
|
Apply a sufficient amount of engine oil to outer surface
of the piston, inner surface of piston pin hole and small end
bore of the connecting rod before inserting the piston pin.
|
| • |
Be careful not to damage and scratch the small
end bore, piston pin hole and piston pin when inserting
the piston pin.
|
| • |
Set the snap ring firmly so that the snap ring
can contact with the whole groove of the piston pin
hole.
|
|
|
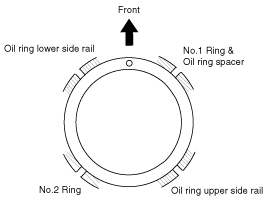
| 2. |
Install the piston rings.
| (1) |
Install the oil ring spacer and 2 side rails by hand.
|
| (2) |
Using a piston ring expander, install the 2 compression
rings with the maker mark facing upward.
|
| (3) |
Position the piston rings so that the ring ends are as
shown. (The No.1 ring should be on the opposite side of the
No.2 ring.)
Example)
|
|
Check to ensure that the oil ring can be turned smoothly.
|
|
| 3. |
Install the connecting rod bearings.
| (1) |
Align the bearing claw with the groove of the connecting
rod or connecting rod cap.
|
| (2) |
Install the bearings (A) in the connecting rod and connecting
rod cap (B).
|
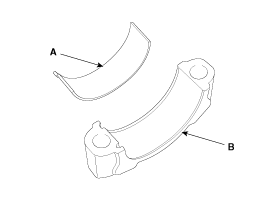
|
Be careful not to change the position of bearing caps.
|
|
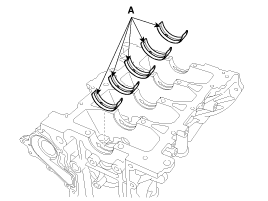
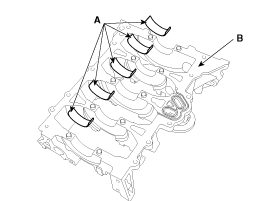
| 4. |
Install the crankshaft main bearings.
|
Upper bearings have an oil groove of oil holes; Lower
bearings do not.
|
| (1) |
Align the bearing claw with the groove of the cylinder
block, and push in the 5 upper bearings (A).
|
| (2) |
Align the bearing claw with the groove of the lower crankcase
(B), and push in the 5 lower bearings (A).
|
|
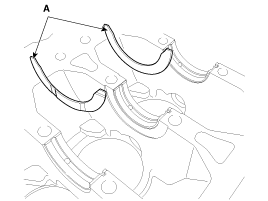
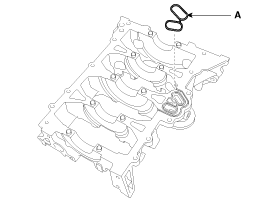
| 5. |
Install the thrust bearings.
Install the 2 thrust bearings (A) on both sides of the No.3 journal
of the cylinder block with the oil groove facing out.
|
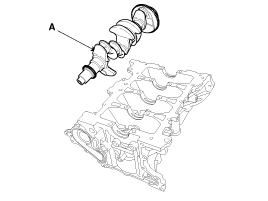
| 6. |
Place the crankshaft (A) on the cylinder block.
|
| 7. |
Apply liquid sealant on the top surface of the lower crankcase.
| (1) |
Using a gasket scraper, remove all the old packing material
from the gasket surfaces.
|
| (2) |
The sealant locations on the lower crankcase and the cylinder
block must be free of harmful foreign materials, oil, dust and
moisture. Spraying cleaner on the surface and wiping with a
clean duster.
|
| (3) |
Assemble a new rubber gasket (A) on the top of lower crankcase.
|
| (4) |
Apply liquid sealant on the bottom of the cylinder block.
Continuous bead of sealant should be applied to prevent any
path from oil leakage.
Bead width: 2.5 ~ 3.5 mm (0.10 ~
0.14 in.)
Sealant: Threebond 1217H or equivalent
|
| •
|
Assemble the lower crankcase within 5
minutes after applying sealant.
|
| •
|
The engine running or pressure test should
not be performed within 30 minutes after assembling
the lower crankcase.
|
| •
|
Excess sealant on application surface
of sealant of following process should be removed
before hardening.
|
| •
|
If the sealant is applied to the top surface
of the lower crankcase, it should be the same
position as the cylinder block.
|
| •
|
To prevent leakage of oil, apply sealant
gasket on the inner threads of the bolt holes.
|
|
|
|
| 8. |
Place the lower crankcase on the cylinder block.
|
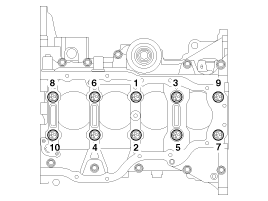
| 9. |
Install the main bearing cap bolts.
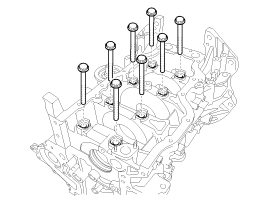
Using SST (09221-4A000), install and tighten the 10 main bearing
cap bolts, in several passes, in the sequence as shown.
Tightening torque
1st step:
27.5 ~ 31.4 N.m (2.8 ~ 3.2 kgf.m, 20.3 ~ 23.1 lb-ft)
2nd step: 120 ~ 125°
|
| • |
Do not reuse the bearing cap bolts.
|
| • |
Do not apply engine oil on the bolt threads to
achieve correct toruqe.
|
|
| • |
The main bearing cap bolts are tightened in 2
progressive steps.
|
| • |
If any of the bearing cap bolts is broken or deformed,
replace it.
|
| • |
Be sure to assemble the main bearing cap bolts
in correct order.
|
|
|
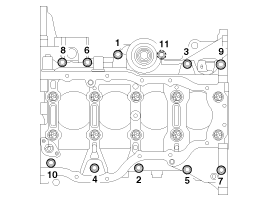
| 10. |
Install the lower crankcase bolts, in several passes, in sequence
as shown.
Tightening torque:
18.6 ~23.5 N.m (1.9 ~ 2.4 kgf.m, 13.7 ~ 17.4 lb-ft)
|
Check that the crankshaft turns smoothly.
|
| 11. |
Check the crankshaft end play.
|
| 12. |
Install the piston and connecting rod assemblies.
| • |
Before installing the piston, apply a coat of
engine oil to the ring grooves and cylinder bores.
|
| • |
Install the piston and connecting rod assembly
with the front marks facing the front of the engine.
|
|
| (1) |
Install the ring compressor, check that the rings are
securely in place, and then position the piston in the cylinder,
and tap it in using the wooden handle of a hammer.
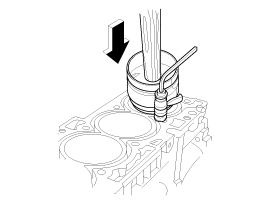
|
| (2) |
Stop after the ring compressor pops free, and check the
connecting rod-to-crank journal alignment before pushing the
piston into place.
|
| (3) |
Apply engine oil to the bolt threads. Install the rod
caps with bearings, and tighten the bolts.
Tightening torque
1st step :
17.7 ~ 21.6 Nm (1.8 ~ 2.2 kgf.m, 13.0 ~ 15.9 lb-ft)
2nd step : 88 ~ 92°
|
|
Do not reuse the connecting rod cap bolts.
|
| •
|
Using the SST (09221-4A000), tighten the
bolts.
|
| •
|
Maintain downward force on the ring compressor
to prevent the rings from expending before entering
the cylinder bore.
|
|
|
|
| 13. |
Check the connecting rod end play.
|
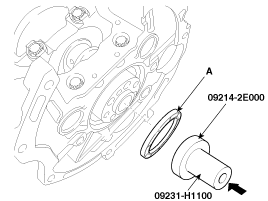
| 14. |
Install a new rear oil seal.
| (1) |
Apply engine oil to a new oil seal lip.
|
| (2) |
Using SST (09231-H1100, 09214-2E000) and a hammer, tap
in the oil seal (A) until the rear oil seal face is aligned
with the cylinder block assembly rear face.
|
|
| 15. |
Install the oil screen. (Refer to Lubrication system in this group)
|
| 16. |
Install the oil filter. (Refer to Lubrication system in this group)
|
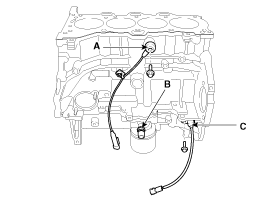
| 17. |
Install the CKPS (Crankshaft position sensor) (C).
Tightening torque:
9.8 ~ 11.8 N.m (1.0 ~ 1.2 kgf.m, 7.2 ~ 8.7 lb-ft)
|
|
| 18. |
Install the OPS (Oil pressure switch) (B).
Tightening torque:
9.8 ~ 11.8 N.m (1.0 ~ 1.2 kgf.m, 7.2 ~ 8.7 lb-ft)
|
|
| 19. |
Install the knock sensor (A).
Tightening torque:
18.6 ~23.5 N.m (1.9 ~ 2.4 kgf.m, 13.7 ~ 17.4 lb-ft)
|
|
| 20. |
Install the water inlet fitting and the thermostat assembly. (Refer
to Cooling system in this group)
|
| 21. |
Install the water pump assembly. (Refer to Cooling system in this
group)
|
| 22. |
Install the A/C compressor. (Refer to HA group - "A/C compressor")
|
| 23. |
Install the cylinder head assembly. (Refer to Cylinder head in
this group)
|
| 24. |
Install the timing chain including the drive belt, the cylinder
head cover, the alternator and the timing chain cover. (Refer to Timing
system in this group)
|
| 25. |
Install the intake manifold and exhaust manifold. (Refer to Intake
and exhaust system in this group)
|
| 26. |
Remove the engine from an engine stand for assembly.
|
| 27. |
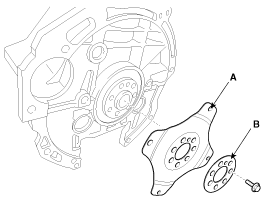
Manual transaxle: Install the flywheel (A).
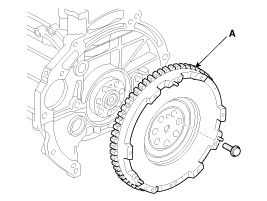
Automatic transaxle: Install the drive plate (A) and the adapter
plate (B).
Tightening torque:
117.7 ~ 127.5 N.m (12.0 ~ 13.0 kgf.m, 86.8 ~ 94.0 lb-ft)
|
|
| 28. |
Assemble the transaxle assembly to the engine assembly. (Refer
to MT or AT group)
|
| 29. |
Install the engine and transaxle assembly to the vehicle. (Refer
to Engine and transaxle assembly in this group)
|
Connecting Rod
1.
Check the connecting rod side clearance.
Using a feeler gauge, measure the end play while moving the connecting
rod back and forth.
...
 Hyundai Elantra: Reassembly

