Engine removal is required for this procedure.
| • |
Use fender covers to avoid damaging painted surfaces.
|
| • |
To avoid damaging the cylinder head, wait until the engine
coolant temperature drops below normal temperature before removing
it.
|
| • |
When handling a metal gasket, take care not to fold the
gasket or damage the contact surface of the gasket.
|
| • |
To avoid damage, unplug the wiring connectors carefully
while holding the connector portion.
|
|
| • |
Mark all wiring and hoses to avoid misconnection.
|
| • |
Turn the crankshaft pulley so that the No.1 piston is
at TDC (Top dead center).
|
|
| 1. |
Remove the engine assembly from the vehicle. (Refer to Engine
and transaxle assembly in this group)
|
| 2. |
Remove the transaxle assembly from the engine assembly. (Refer
to MT or AT group)
|
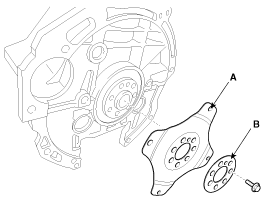
| 3. |
Manual transaxle: Remove the flywheel (A).
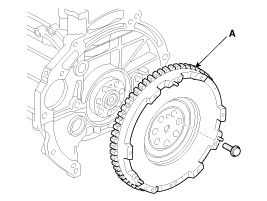
Automatic transaxle: Remove the drive plate (A) and the adapter
plate (B).
|
| 4. |
Fix the engine to an engine stand for disassembly.
|
| 5. |
Remove the intake manifold and exhaust manifold. (Refer to Intake
and exhaust system in this group)
|
| 6. |
Remove the timing chain including the drive belt, the cylinder
head cover, the alternator and the timing chain cover. (Refer to Timing
system in this group)
|
| 7. |
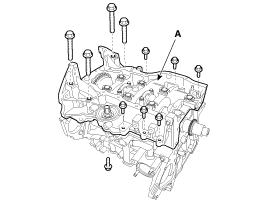
Remove the cylinder head assembly. (Refer to Cylinder head in
this group)
|
| 8. |
Remove the A/C compressor. (Refer to HA group - "A/C compressor")
|
| 9. |
Remove the water pump assembly. (Refer to Cooling system in this
group)
|
| 10. |
Remove the water inlet fitting and the thermostat assembly. (Refer
to Cooling system in this group)
|
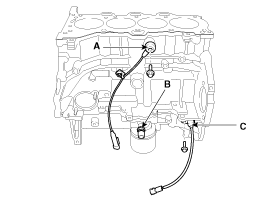
| 11. |
Remove the knock sensor (A).
|
| 12. |
Remove the OPS (Oil pressure switch) (B).
|
| 13. |
Remove the CKPS (Crankshaft position sensor) (C).
|
| 14. |
Remove the oil filter. (Refer to Lubrication system in this group)
|
| 15. |
Remove the oil screen. (Refer to Lubrication system in this group)
|
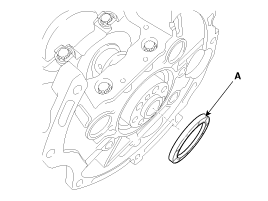
| 16. |
Remove the rear oil seal (A).
|
| 17. |
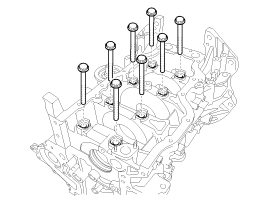
Remove the lower crankcase.
| (1) |
Remove the lower crankcase mounting bolts.
|
| (2) |
Remove the main bearing cap bolts.
|
|
| 18. |
Check the connecting rod side clearance.
|
| 19. |
Check the connecting rod bearing oil clearance.
|
| 20. |
Remove piston and connecting rod assemblies.
| (1) |
Using a ridge reamer, remove all the carbon from the top
of the cylinder.
|
| (2) |
Push the piston and connecting rod assembly with upper
bearing through the top of the cylinder block.
| •
|
Keep the bearings, connecting rod and
cap together.
|
| •
|
Arrange the piston and connecting rod
assemblies in the correct order.
|
|
|
|
| 21. |
Check the connecting rod bearing oil clearance.
|
| 22. |
Check the crankshaft end play.
|
| 23. |
Lift the crankshaft (A) out of the engine, being careful not to
damage journals.
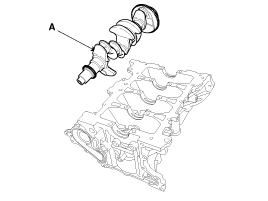
|
Arrange the main bearings and thrust bearings in the correct
order.
|
|
| 24. |
Check fit between piston and piston pin. Try to move the piston
back and forth on the piston pin. If any movement is felt, replace the
piston and pin as a set.
|
| 25. |
Remove piston rings.
| (1) |
Using a piston ring expander, remove the 2 compression
rings.
|
| (2) |
Remove 2 side rails and the oil ring by hand.
|
|
Arrange the piston rings in the correct order.
|
|
| 26. |
Remove the snap rings and then disassemble the connecting rod
from the piston.
|
Connecting Rod
1.
Check the connecting rod side clearance.
Using a feeler gauge, measure the end play while moving the connecting
rod back and forth.
...
 Hyundai Elantra: Disassembly

