 Hyundai Elantra: Clutch Master Cylinder. Repair procedures
Removal
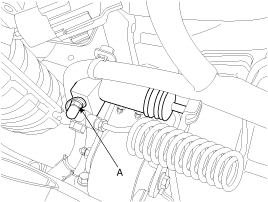
| 1. |
Drain the brake fluid through the bleeding plug (A).
|
| 2. |
Remove the flexible hose (A) connected to brake reserve tank from
the master cylinder.
|
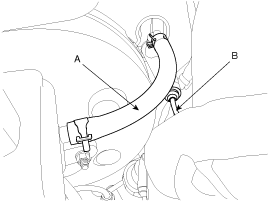
| 3. |
Disconnect the clutch tube (B) from the master cylinder.
|
| 4. |
Disconnect the two ignition lock switch connectors.
|
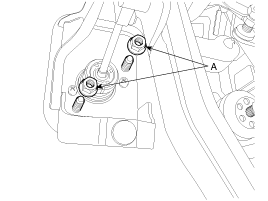
| 5. |
Remove the clutch pedal mounting nuts(A-2ea) and the bracket mounting
nut.
|
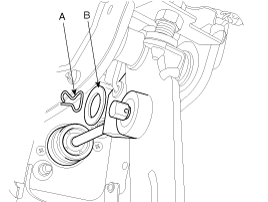
| 6. |
Disconnect the push rod from the master cylinder by removing the
snap pin (A) and washer (B).
|
| 7. |
Remove the screws or nut mounting the master cylinder to the clutch
pedal assembly.
|
Disassembly
| 1. |
Remove the piston stop ring.
|
| 2. |
Pull out the push rod and piston assembly.
|
| 3. |
Remove the reserve tank band, reserve tank cap, and reserve tank.
|
Installation
| 1. |
Apply the specified grease to the clutch pedal and bushings.
|
| 2. |
Install the screws or nut mounting the master cylinder to the
clutch pedal assembly.
|
| 3. |
Apply the specified grease to the snap pin(A) and washer.
|
| 4. |
Connect the push rod to the clutch pedal by installing the snap
pin (A) and washer (B).
|
| 5. |
Install the clutch pedal mounting nuts (A-2ea).
|
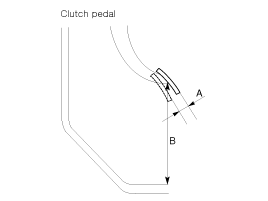
| 6. |
Adjust the clutch pedal within the standard value, then secure
by tightening the lock nut.
|
| 7. |
Connect the flexible hose of the brake reserve tank to the master
cylinder.
|
| 8. |
Connect the clutch tube(B) to the master cylinder.
|
| 9. |
Refill the brake fluid.
|
| 10. |
Bleed the air in the clutch system.(refer to Bleeding in Serive
Adjustment Procedure)
|
Inspection
| 1. |
Check the inside of the cylinder body for rust, pitting or scoring.
|
| 2. |
Check the piston cup for wear or distortion.
|
| 3. |
Check the piston for rust, pitting or scoring.
|
| 4. |
Check to make sure the clutch line tube is not clogged or restricted
in any way.
|
| 5. |
Measure the master cylinder inside diameter and the piston outside
diameter with a cylinder gauge micrometer.
|
| 6. |
If the master cylinder-to-piston clearance exceeds the limit,
replace the master cylinder and/or piston assembly.
|
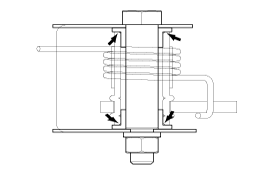
Reassembly
| 1. |
Apply the specified fluid to the inner surface of the master cylinder
body (A) and to the entire periphery of the piston assembly (B).
|
| 2. |
Install the piston assembly.
|
| 3. |
Install the piston snap ring.
|
| 4. |
Install the push rod assembly.
|


