 Hyundai Elantra CN7: Cooling System
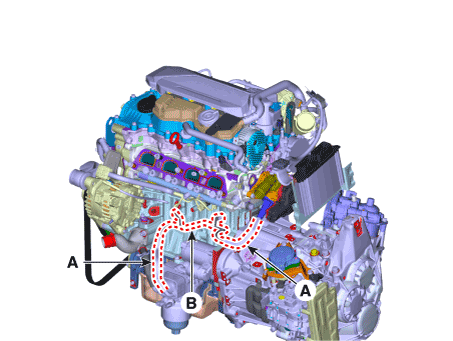
Components and components location
| Components |
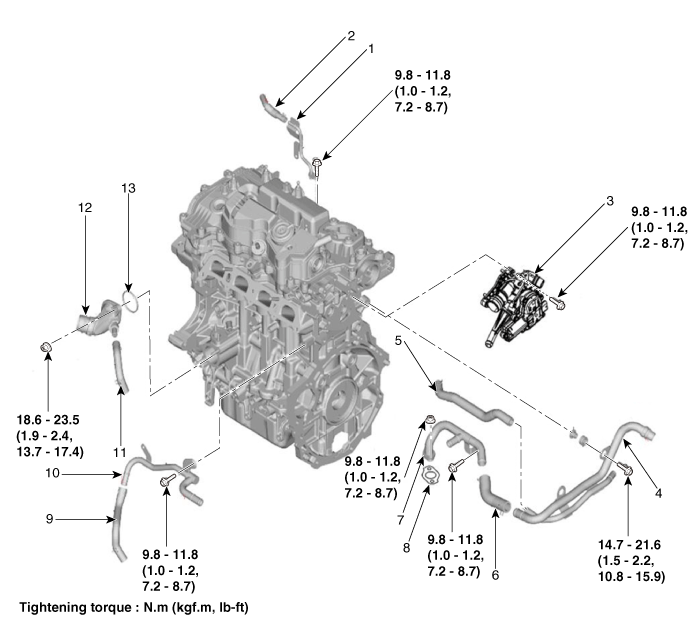
| 1. Water pipe 2. Water hose 3. Integrated thermal management module (ITM) 4. Heater pipe 5. Turbo charger coolant hose 6. Heater hose 7. Heater pipe A | 8. Heater pipe A gasket 9. Oil cooler hose A 10. Oil cooler pipe 11. Oil cooler hose B 12. Water inlet fitting 13. Water inlet fitting O-ring |
Troubleshooting
| Engine Overheat Troubleshooting |
|
|
Inspection
|
Remedy
| ||||
| Visual inspection | Inspect for shortage of coolant in reservoir tank . | Reinspect after replenishing coolant. | ||||
| Inspect for coolant pollution after removing radiator cap. | Reinspect after replacing coolant. | |||||
| ||||||
| Inspect for leakage and loose coolant hoses (radiator hose, heater hose, oil cooler hose, etc.). | Reinspect for leakage after reinstalling hoses and clamps. | |||||
| Checking for coolant leaks of Integrated Thermal Management Module (ITM) | Replace O-ring or replace the integrated thermal management module (ITM) if required | |||||
| Inspecting the heater pipe connection to find coolant leaks. | Reinspect for leakage after reinstalling hoses and clamps. | |||||
| Inspect for leakage on water inlet fitting mounting part. | Reinspect for leakage after replacing O-ring. | |||||
| Reinspect for leakage after tightening to the specified torque. | ||||||
| Inspect drive belt (for normal operation of water pump). | Adjust drive belt tension or replace. | |||||
| Inspect for leakage on water pump gasket mounting part. | Reinspect for leakage after replacing gasket. | |||||
| Reinspect for leakage after tightening to the specified torque. | ||||||
| Inspect for loose coolant temperature sensor, cooling fan connector and pin. | Reinstall loose connector. | |||||
| Replace relevant part if connector pin is damaged. | ||||||
| Inspect operation status of cooling fan. - Check operation status by switching ON/OFF the heater control A/C. | Check mounting status of ground cable. | |||||
| ||||||
| Diagnostic device | Inspect self-diagnostic code using diagnostic tool. | Check coolant temperature sensor, wiring, connector, etc. | ||||
| Unit inspection | Inspect water pump impeller. | Replace water pump. |


Coolant
Repair procedures
| Replacement and Air Bleeding |
|
|

If Diagnostic Tool is available, change the coolant and drain air according to the descriptions below.
| 1. | Make sure the engine and radiator are cool to the touch. |
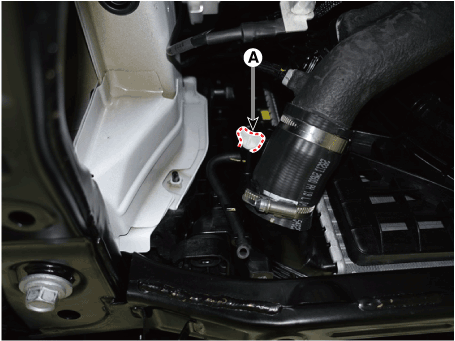
| 2. | Remove the coolant reservoir tank cap (A).
|

| 3. | Remove the engine room under cover. (Refer to Engine and Transaxle Assembly - "Engine Room Under Cover") |
| 4. | Loosen the drain plug (A), and drain the coolant.
|
| 5. | Tighten the radiator drain plug securely after draining the coolant. |
| 6. | Clean the coolant reservoir tank after drain the coolant. |
| 7. | IG Key OFF, Fill with fluid mixture of coolant and water (45 - 60%) slowly through the coolant reservoir tank cap.
|
| 8. | Connect the diagnostic tool and then Key 'IG ON'. |
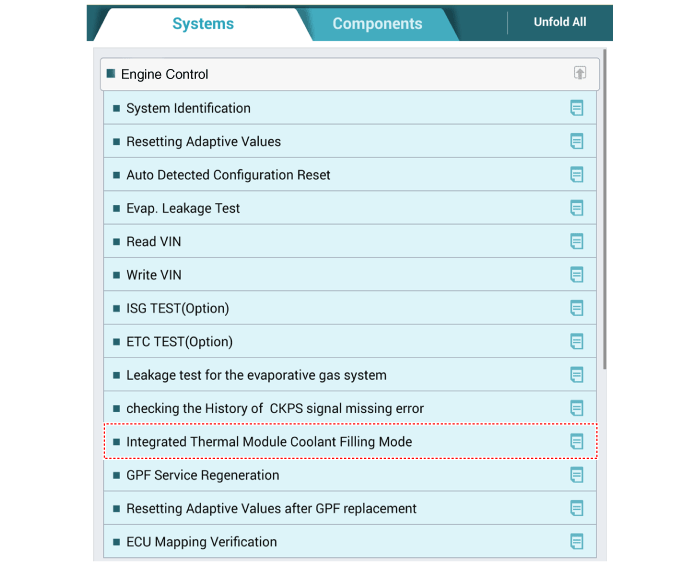
| 9. | Use the diagnostic tool to activate the "integrated thermal management module (ITM) coolant refilling mode".
|
| 10. | Complete the ITM coolant refilling mode according to the procedure of the diagnostic tool. |
| 11. | Key-off and then disconnect the diagnostic tool.
|
| 12. | Install the coolant reservoir tank cap (A).
|
| 13. | Check the coolant quantity after driving the vehicle. |
| 14. | If the coolant is insufficient, replenish it. |
| 15. | Install the engineroom under cover. (Refer to Engine and Transaxle Assembly - "Engine Room Under Cover") |
If Diagnostic Tool is not available, replace the coolant and drain air according to the descriptions below.
| 1. | Make sure the engine and radiator are cool to the touch. |
| 2. | Remove the coolant reservoir tank cap (A).
|
| 3. | Remove the engine room under cover. (Refer to Engine and Transaxle Assembly - "Engine Room Under Cover") |
| 4. | Loosen the drain plug (A), and drain the coolant.
|
| 5. | Tighten the radiator drain plug securely after draining the coolant. |
| 6. | Clean the coolant reservoir tank after drain the coolant. |
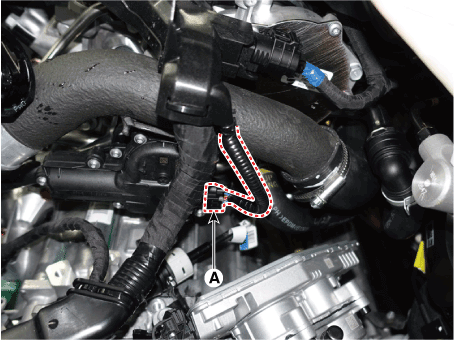
| 7. | Key-off and then disconnect the integrated thermal management module (ITM) connector (A).
|
| 8. | Fill with fluid mixture of coolant and water (45 - 60%) slowly through the coolant reservoir tank cap.
|
| 9. | After starting the engine, refill the coolant for 20 minutes used by coolant reservoir tank. |
| 10. | After shut engine off and connect the integrated thermal management module (ITM) connector (A).
|
| 11. | After starting the engine for 5 seconds, turn off the engine.
|
| 12. | Install the coolant reservoir tank cap (A).
|
| 13. | Check the coolant quantity after driving the vehicle. |
| 14. | If the coolant is insufficient, replenish it. |
| 15. | Install the engineroom under cover. (Refer to Engine and Transaxle Assembly - "Engine Room Under Cover") |
Coolant Reservoir Tank
Repair procedures
| Removal and Installation |
| 1. | Drain the coolant. (Refer to Cooling System - "Coolant") |
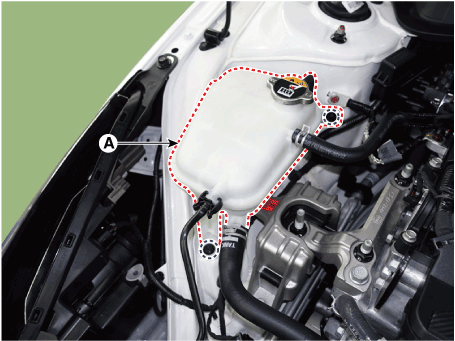
| 2. | Disconnect the degassing hose (A) and coolant reservoir tank hose (B).
|
| 3. | Remove the coolant reservoir tank (A).
|
| 4. | Install in the reverse order of removal. |
| 5. | Fill with engine coolant. (Refer to Cooling System - "Coolant")
|
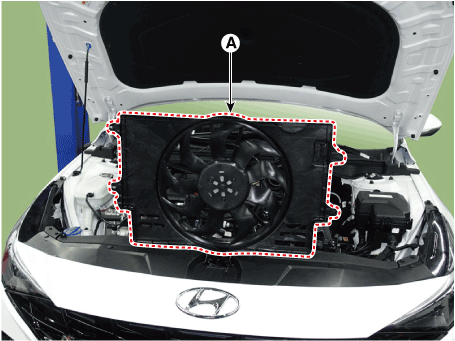
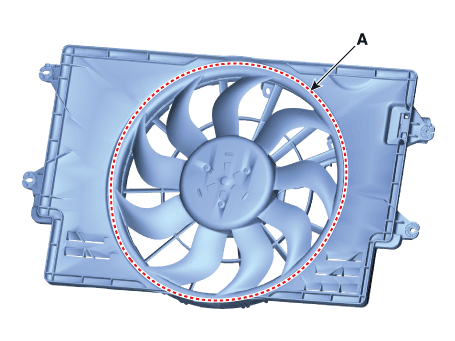
Cooling Fan
Components and components location
| Components |
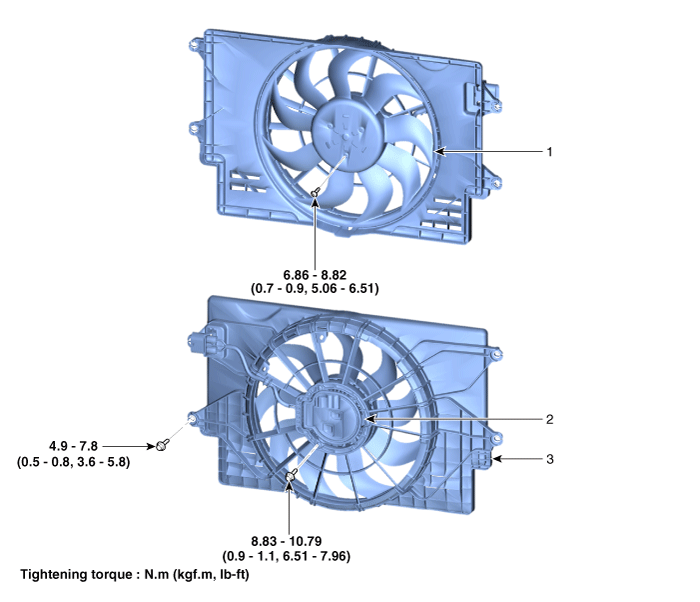
| 1. Cooling fan 2. Fan motor | 3. Cooling fan shroud |
Repair procedures
| Removal and Installation |
Cooling Fan Assembly
| 1. | Disconnect the negative battery terminal. |
| 2. | Remove the air duct and air cleaner assembly. (Refer to Intake and Exhaust System - "Air Cleaner") |
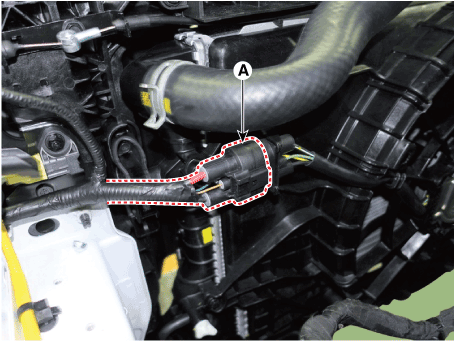
| 3. | Disconnect the cooling fan connector (A).
|
| 4. | Disconnect the degassing hose (A) and hose fastener.
|
| 5. | Remove the filler neck assembly (A).
|
| 6. | Remove the cooling fan (A) from the radiator.
|
| 7. | Install in the reverse order of removal. |
| Disassembly |
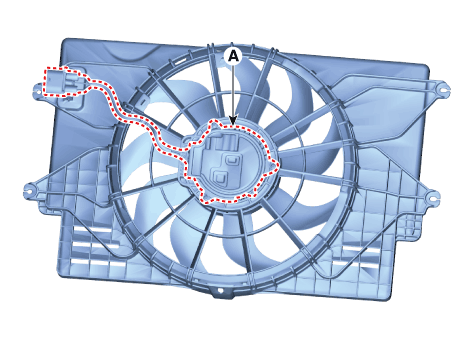
| 1. | Remove the cooling fan (A) from the cooling fan assembly.
|
| 2. | Remove the fan motor (A) from the cooling fan shroud.
|
| 3. | Install in the reverse order of removal. |
| Inspection |
Fan motor
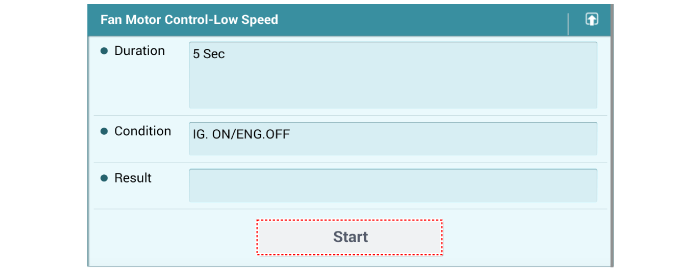
| 1. | Turn ignition switch "OFF" and connect the diagnostic tool to the Data Link Connector. |
| 2. | With the gear shift in P (Park) position and ignistion switch "ON" (LED of the Power button illuminates in Red), select the "force drive" function. |
| 3. | Force drive the cooling fan motor.
|

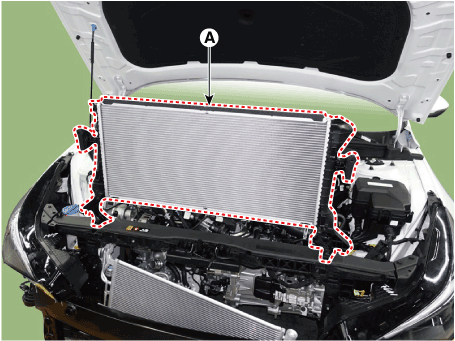
Radiator
Components and components location
| Components |
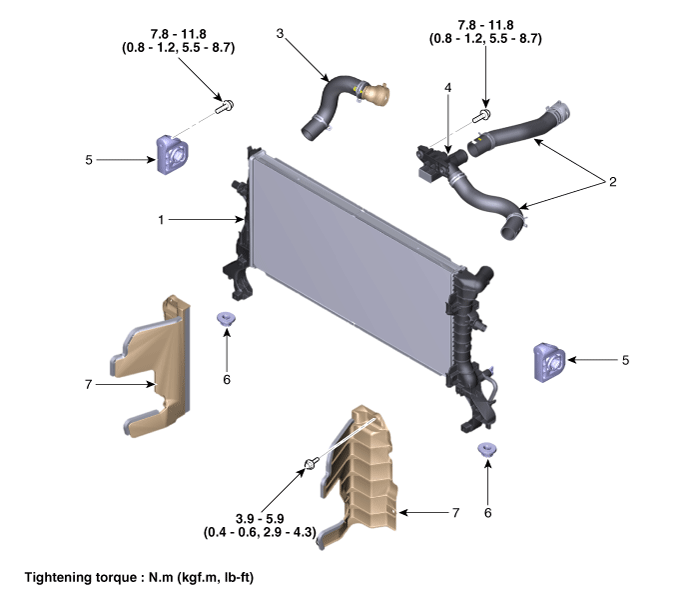
| 1. Radiator 2. Radiator upper hose 3. Radiator lower hose 4. Filler neck assembly | 5. Radiator upper mounting bracket 6. Radiator lower mounting insulator 7. Radiator air guard |
Repair procedures
| Removal and Installation |
| 1. | Disconnect the battery negative terminal. |
| 2. | Remove the engine room under cover. (Refer to Engine and Transaxle Assembly - "Engine Room Under Cover") |
| 3. | Drain the coolant. (Refer to Cooling System - "Coolant") |
| 4. | Remove the cooling fan assembly. (Refer to Cooling System - "Cooling Fan") |
| 5. | Disconnect the radiator lower hose (A).
|
| 6. | Disconnect the radiator upper hose (A)
|
| 7. | Remove the front bumper. (Refer to Body (Interior and Exterior) - "Front Bumper") |
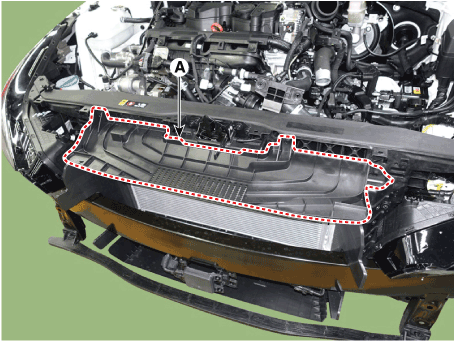
| 8. | Remove the air guard (A).
|
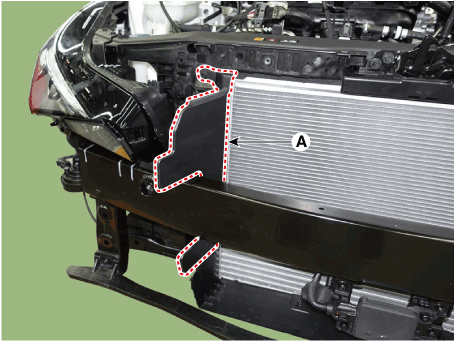
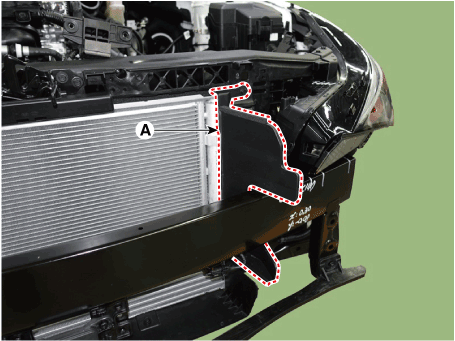
| 9. | Remove the side air guard (A).
[RH]
[LH]
|
| 10. | Loosen the intercooler mounting bolts (A).
[RH]
[LH]
|
| 11. | Remove the radiator upper mounting bracket bolts (A).
[RH]
[LH]
|
| 12. | Separate the A/C condenser from the radiator and then remove the radiator (A) from the vehicle.
|
| 13. | Install in the reverse order of removal. |
| 14. | Fill with engine coolant. (Refer to Cooling System - "Coolant")
|
| 15. | Start engine and check for leaks. |
| Inspection |
Radiator Leakage Test
| 1. | Wait for the engine to cool. Carefully remove the coolant reservoir tank cap and fill the radiator with engine coolant. Then, install it on the pressure tester. |
| 2. | Apply a pressure tester to the radiator and apply a pressure of 125.3 - 154.7 kPa (1.28 - 1.58 kgf/cm², 22.44 - 18.17 psi). |
| 3. | Inspect for engine coolant leaks and a drop in pressure. |
| 4. | Remove the tester and reinstall the radiator cap.
|
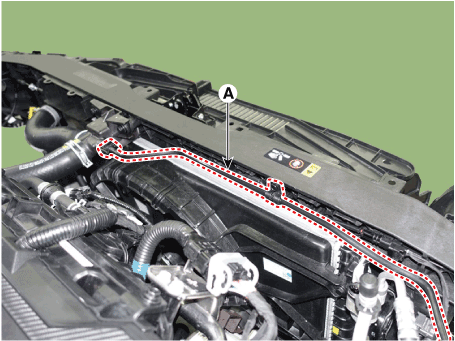
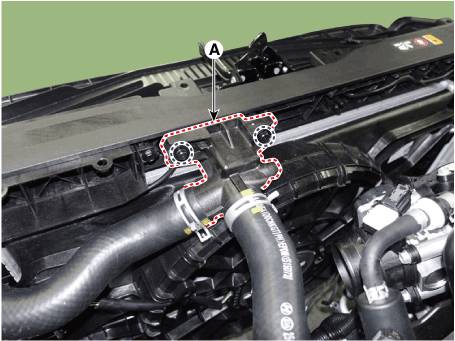
Integrated Thermal Management Module (ITM)
Components and components location
| Components |
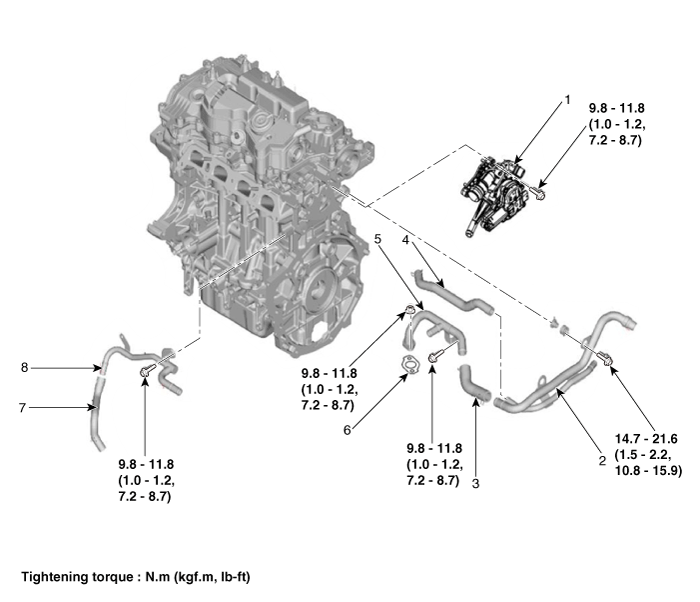
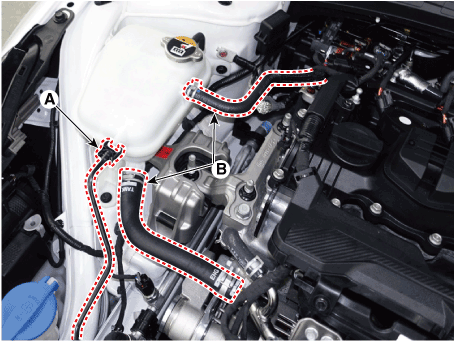
| 1. Integrated thermal management module (ITM) 2. Heater pipe 3. Heater hose 4. Turbo charger coolant hose | 5. Heater pipe A 6. Heater pipe A gasket 7. Oil cooler hose A 8. Oil cooler pipe |
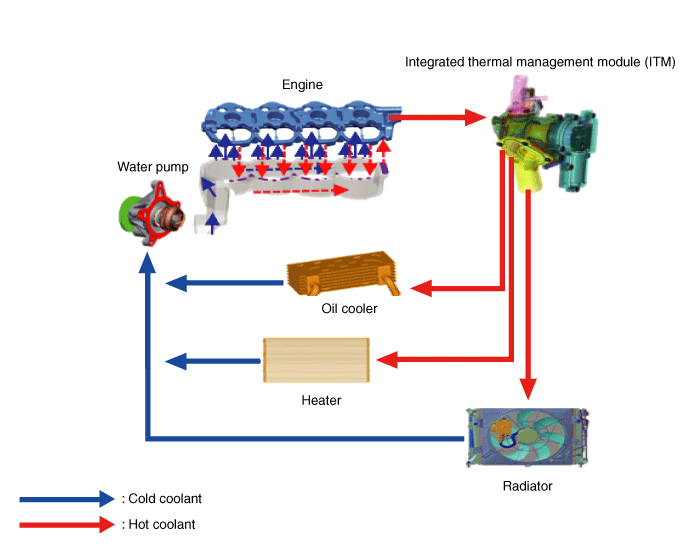
Description and operation
| Description |
Integrated thermal management module (ITM) is a device that controls the coolant flow rate according to coolant temperature. At initial startup, the integrated thermal management module (ITM) quickly warms up the engine by controlling the flow of the coolant and this fast warm-up helps improve the fuel efficiency. When the coolant temperature rises, the integrated thermal management module (ITM) adjusts the cooling water temperature by controlling the valves to regulate the flow of coolant through a radiator or heater.
Repair procedures
| Removal and Installation |
Integrated Thermal Management Module (ITM)
|
| 1. | Disconnect the battery negative terminal. |
| 2. | Remove the engine room under cover. (Refer to Engine and Transaxle Assembly - "Engine Room Under Cover") |
| 3. | Drain the coolant. (Refer to Cooling System - "Coolant") |
| 4. | Remove the air duct and air cleaner assembly. (Refer to Intake and Exhaust System - "Air Cleaner") |
| 5. | Remove the battery. (Refer to Engine Electrical System - "Battery") |
| 6. | Remove the battery tray. (Refer to Engine Electrical System - "Battery") |
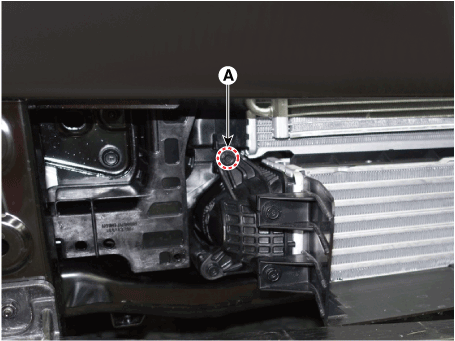
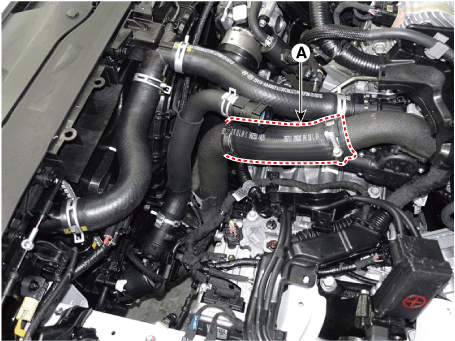
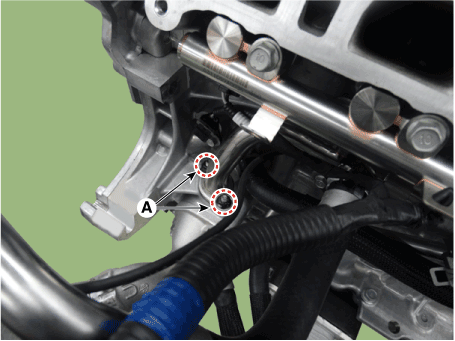
| 7. | Disconnect the integrated thermal management module (ITM) connector (A).
|
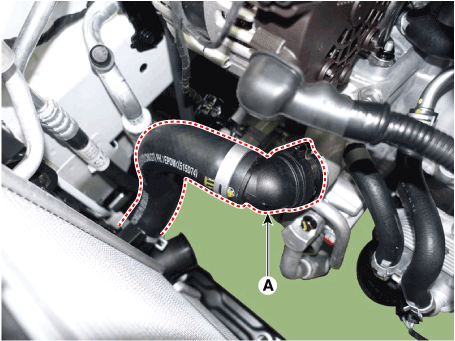
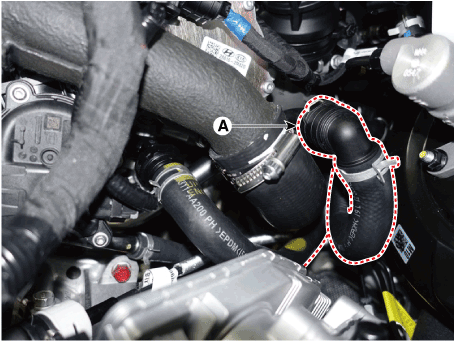
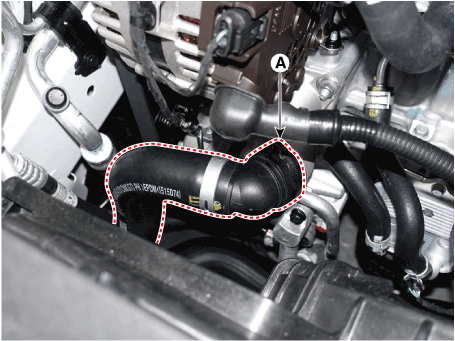
| 8. | Disconnect the intercooler inlet hose (A).
|
| 9. | Remove the intercooler pipe (A).
|

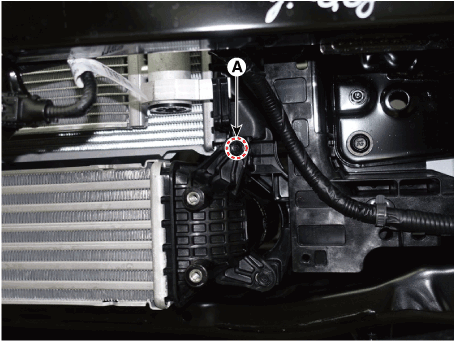
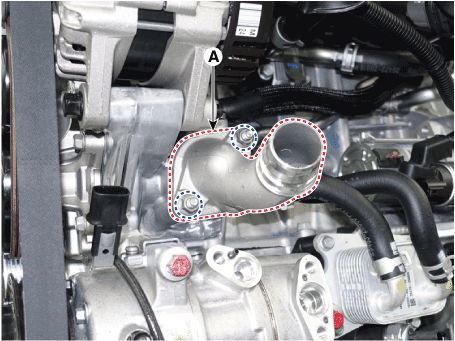
| 10. | Disconnect the radiator upper hose (A).
|

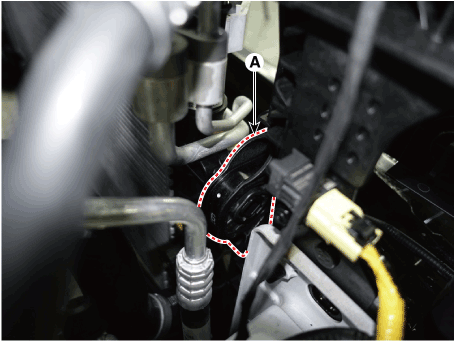
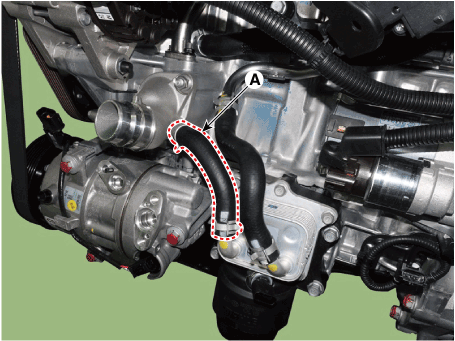
| 11. | Disconnect the heater hose (A).
|
| 12. | Disconnect the oil cooler hose (A).
|
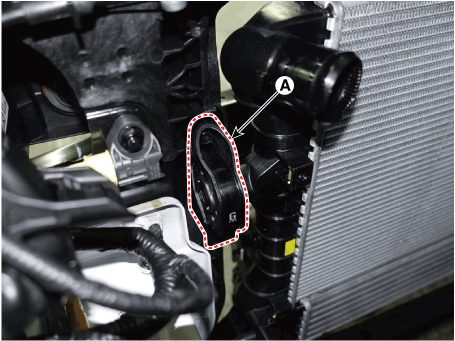
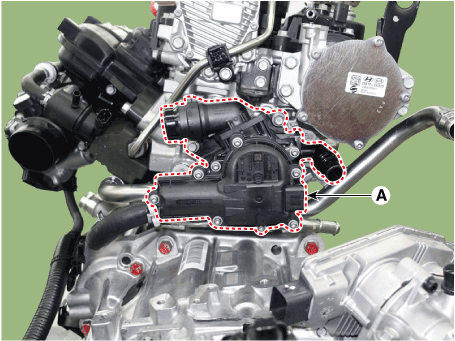
| 13. | Remove the integrated thermal management module (ITM) (A).
|
| 14. | Install in the reverse order of removal. |
| 15. | Fill with engine coolant. (Refer to Cooling System - "Coolant")
|
| 16. | Start engine and check for leaks. |
Heater Pipe
| 1. | Disconnect the battery negative terminal. |
| 2. | Remove the engine cover. (Refer to Engine and Transaxle Assembly - "Engine Cover") |
| 3. | Remove the engine room under cover. (Refer to Engine and Transaxle Assembly - "Engine Room Under Cover") |
| 4. | Drain the coolant. (Refer to Cooling System - "Coolant") |
| 5. | Remove the air duct and air cleaner assembly. (Refer to Intake and Exhaust System - "Air Cleaner") |
| 6. | Remove the battery. (Refer to Engine Electrical System - "Battery") |
| 7. | Remove the battery tray. (Refer to Engine Electrical System - "Battery") |
| 8. | Disconnect the heater hoses (A).
|
| 9. | Remove the integrated thermal management module (ITM). |
| 10. | Remove the intake manifold. (Refer to Intake and Exhaust System - "Intake Manifold") |
| 11. | Remove the drive belt. (Refer to Drive Belt System - "Drive Belt") |
| 12. | Remove the alternator. (Refer to Engine Electrical System - "Alternator") |
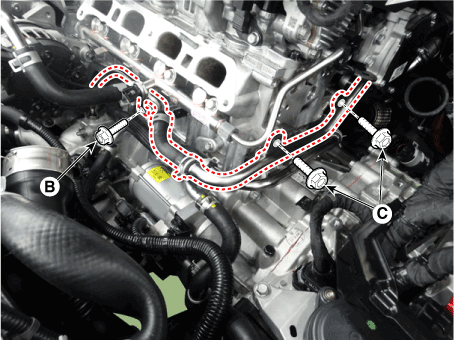
| 13. | Disconnect the wiring connectors and harness clamps and remove the connector brackets around the heater pipe. |
| 14. | Remove the heater pipe B mounting nuts (A)
|
| 15. | Disconnect the heater outlet pipe hose (A).
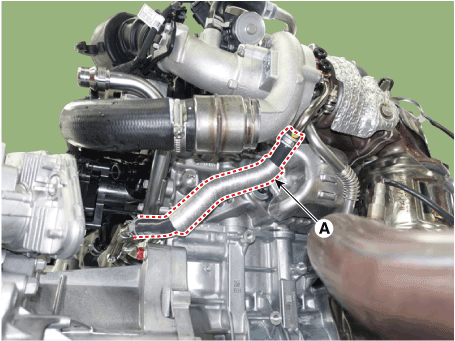
|

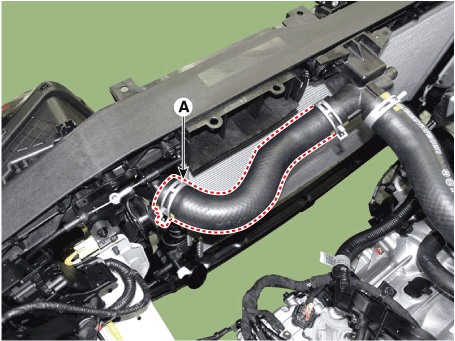
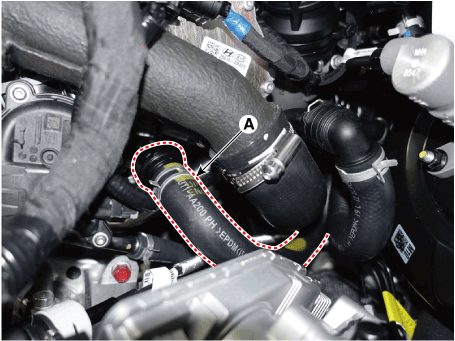
| 16. | Disconnect the turbo charger coolant hose A (A).
|
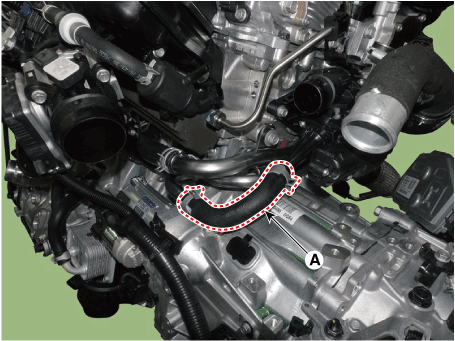
| 17. | Remove the heater pipe A and heater pipe B (A).
|
| 18. | Install in the reverse order of removal.
|
| 19. | Fill with engine coolant. (Refer to Cooling System - "Coolant")
|
| 20. | Start engine and check for leaks. |
Oil cooler pipe
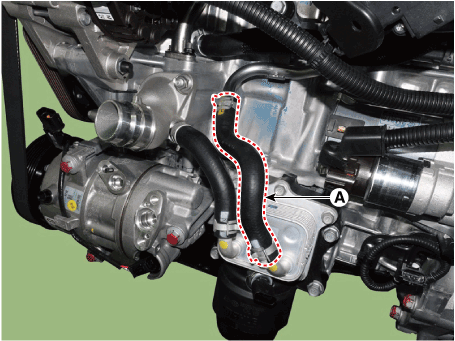
| 1. | Remove the heater pipe |
| 2. | Disconnect the cooler hose (A).
|
| 3. | Disconnect the cooler hose (A).
|
| 4. | Rmove the oil cooler pipe (A) after loosening the mounting bolts.
|
| 5. | Install in the reverse order of removal. |
| 6. | Fill with engine coolant. (Refer to Cooling System - "Coolant")
|
| 7. | Start engine and check for leaks. |
Water Inlet Fitting
Repair procedures
| Removal |
Water Inlet Fitting
| 1. | Remove the engine room under cover. (Refer to Engine and Transaxle Assembly - "Engine Room Under Cover") |
| 2. | Drain the coolant. (Refer to Cooling System - "Coolant") |
| 3. | Disconnect the radiator lower hose (A).
|
| 4. | Disconnect the oil cooler hose (A).
|
| 5. | Remove the water inlet fitting (A).
|
| 6. | Install in the reverse order of removal.
|
| 7. | Fill with engine coolant. (Refer to Cooling System - "Coolant")
|
| 8. | Start engine and check for leaks. |
Water pump
Components and components location
| Components |
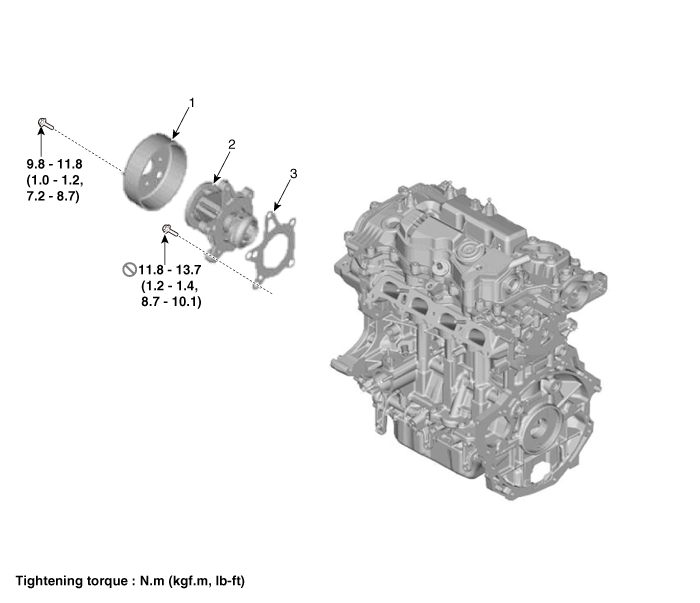
| 1. Water pump pulley 2. Water pump | 3. Water pump gasket |
Repair procedures
| Removal |
| 1. | Remove the engine room under cover. (Refer to Engine and Transaxle Assembly - "Engine Room Under Cover") |
| 2. | Drain the coolant. (Refer to Cooling System - "Coolant") |
| 3. | Remove the drive belt. (Refer to Drive Belt System - "Drive Belt") |
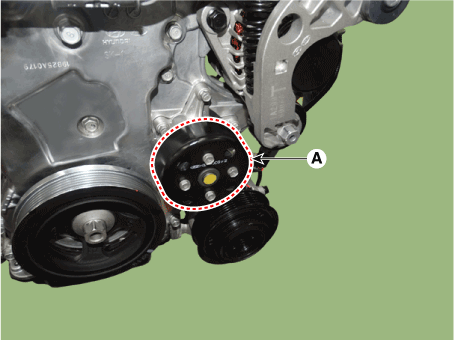
| 4. | Remove the water pump pulley (A).
|
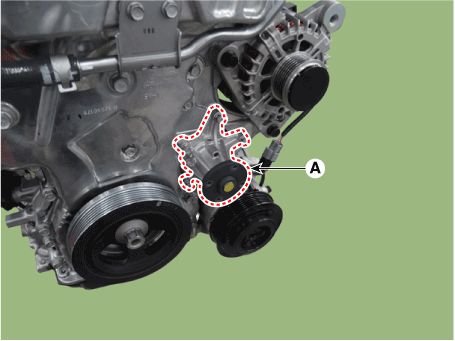
| 5. | Remove the water pump (A) and gasket.
|
| 6. | Install in the reverse order of removal.
|
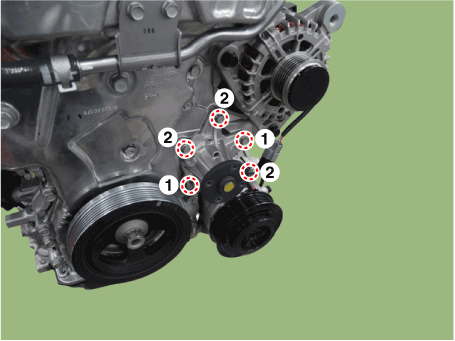

| 7. | Fill with engine coolant. (Refer to Cooling System - "Coolant")
|
| 8. | Start engine and check for leaks. |
Troubleshooting
| Troubleshooting |
|
Trouble Symptom
|
Probable Cause
|
Remedy
| ||||||||||||||||
| Coolant leakage |
| Visually check |
|
| ||||||||||||||
| ||||||||||||||||||
| ||||||||||||||||||
|
|
| ||||||||||||||||
|
| |||||||||||||||||
|
|
| ||||||||||||||||
| Noise |
| Inspection with a stethoscope |
|
| ||||||||||||||
| ||||||||||||||||||
| Inspection after removing a drive belt |
|
| ||||||||||||||||
| ||||||||||||||||||
| Inspection after removing a water pump |
|
| ||||||||||||||||
| Overheating |
| Loosened impeller |
|
| ||||||||||||||
|
| |||||||||||||||||
| Obstruction of radiator by foreign matter Check the front of the condenser/radiator inside the bumper for contamination by debris. |
| ||||||||||||||||


